
Main Courses
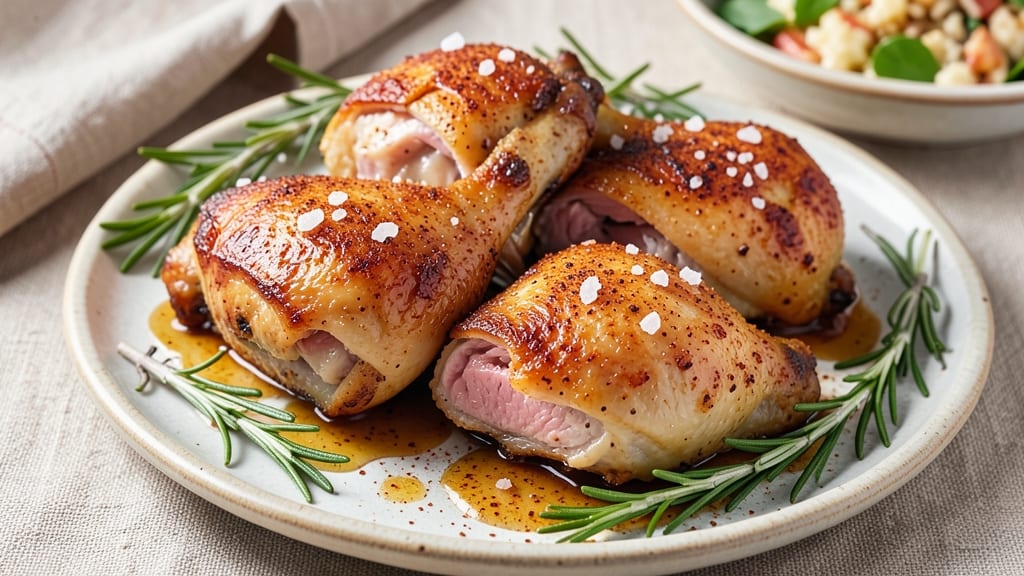
This air fried bone-in chicken thighs recipe delivers restaurant-quality results with crispy skin and juicy meat in just 25 minutes. The secret lies in proper seasoning, high heat, and a technique that locks in moisture while creating that coveted golden-brown crust.
After years of perfecting this method, I can confidently say this is the closest you'll get to crispy-fried chicken without deep frying.
The process begins with a dry brine that enhances flavor and tenderness, followed by a simple but effective seasoning blend. Your air fryer will work its magic at 375°F, where the thighs develop that perfect balance of crispy skin and succulent interior.
The key steps include preheating the air fryer, proper placement of the thighs, and a quick basting technique that ensures even cooking.
What you'll end up with is chicken that's golden and crispy on the outside, with meat so tender it practically falls off the bone. The flavor is rich and well-seasoned, with a satisfying crunch that disappears into juicy, flavorful meat.
This method transforms a simple weeknight dinner into something that feels special without requiring hours in the kitchen.
The best part? These thighs pair beautifully with classic sides like mashed potatoes, roasted vegetables, or a fresh salad. The crispy skin holds up well for serving, making it perfect for meal prep or entertaining. Let's get started on creating your perfect air-fried chicken thighs.
Ingredients for air fried bone in chicken thighs
These 11 ingredients transform ordinary chicken thighs into restaurant-quality crispy perfection.
| Ingredient | Amount | Notes |
|---|---|---|
| Bone-In Chicken Thighs 🍗 | 1 ½ lb | Skin-on, similar-sized pieces |
| Diamond Crystal Kosher Salt 🧂 | 1 ½ tbsp | For dry brine (plus extra) |
| Ground Black Pepper 🌶️ | 1 tsp | Freshly cracked for best flavor |
| Garlic Powder 🧄 | 1 tsp | High-quality for depth of flavor |
| Smoked Paprika 🌶️ | ½ tsp | Adds subtle smokiness |
| Onion Powder 🧅 | ½ tsp | For aromatic base |
| Cornstarch 🌾 | 1 tbsp | For crispy skin texture |
| Extra-Virgin Olive Oil 🫒 | 1 tbsp | High smoke point preferred |
| Fresh Lemon Juice 🍋 | 1 tsp | Brightens flavor profile |
| Unsalted Butter 🧈 | 1 tbsp | Melted for basting |
| Fresh Rosemary 🌿 | 2 sprigs | For aromatic depth |
The chicken thighs are non-negotiable—bone-in, skin-on pieces are essential for that crispy skin and juicy meat. Look for thighs with good fat marbling at the grocery store's meat department, preferably from Costco or Whole Foods for quality. The thighs should be roughly the same size to ensure even cooking. For the dry brine, use Diamond Crystal kosher salt—it dissolves better than table salt. If your store doesn't carry it, any kosher salt will work, but the flavor profile will be slightly different. The cornstarch is the secret weapon for that irresistible crunch—don't skip it!
No smoked paprika? Regular paprika plus a pinch of cayenne gets you close. Running out of fresh rosemary? Dried rosemary at one-third the amount works, but fresh is ideal. The butter for basting matters—use unsalted butter so you control the saltiness. For a quicker prep, you can skip the lemon juice, but it really brightens up the flavor. If you're prepping ahead, pat the thighs dry thoroughly and refrigerate them uncovered for up to 24 hours before cooking—this enhances the crispiness. The olive oil should have a high smoke point—avocado oil works too if you're concerned about burning.
Store any leftover chicken thighs in an airtight container for up to 3 days in the fridge. They reheat beautifully—just pop them back in the air fryer at 350°F for 5-7 minutes until crispy again. For meal prep, portion the thighs into individual containers with a side of sauce or gravy. The crispiness holds up well for 2 days if stored properly. Freeze any extras for up to 3 months—thaw overnight in the fridge before reheating. The skin stays crispy even after freezing, which is a total game-changer for busy weeks.
Why You'll Love This Recipe
- No Fuss, Big Payoff: I swear by this method—just pat dry those bone-in thighs, sprinkle kosher salt and garlic powder, then toss in the air fryer. The bones stay crispy, the meat stays juicy, and I’m not stuck babysitting a pot on the stove.
- Smoky Magic in Minutes: That smoked paprika and black pepper combo? It’s like a campfire in your kitchen. The air fryer renders the fat perfectly, leaving you with a skin that’s crispy enough to stand up to a fork—no deep-frying required.
- Leftovers That Don’t Suck: Honestly, I always make extra because reheating these is a dream. The skin stays crispy, the meat stays tender, and they’re perfect cold in sandwiches or salads the next day. (Yes, even on a Tuesday night.)
- Budget-Friendly Protein Powerhouse: Bone-in thighs are cheaper than breasts, and they’re packed with flavor. I buy them in bulk, freeze what I don’t use, and still get restaurant-quality results without the markup. Plus, the spices cost pennies.
Step-by-step instructions for air fried bone-in chicken thighs
Here's how to get perfectly crispy skin and impossibly juicy meat every time—no deep frying required.
Dry Brine the Chicken for Maximum Flavor and Crisp
Pat the 1.5 lb bone-in chicken thighs completely dry with paper towels—this is non-negotiable for crispy skin. Place them skin-side up in a shallow dish and sprinkle 1.5 tbsp Diamond Crystal kosher salt evenly over the skin and meat. The salt should cling to every surface, not just pile in one spot.
Let the thighs sit uncovered in the refrigerator for at least 1 hour (up to 4 hours for deeper flavor). This dry brine draws out moisture from the meat, which evaporates during air frying, creating that irresistible crispy texture. The salt also penetrates deeply, seasoning the meat throughout. Don't skip this step—it's what transforms good chicken into spectacular chicken.
Season and Coat with Cornstarch for Extra Crisp
After brining, remove the thighs from the fridge and let them sit at room temperature for 15 minutes. In a small bowl, mix together 1 tsp ground black pepper, 1 tsp garlic powder, 0.5 tsp smoked paprika, and 0.5 tsp onion powder. Gently pat the thighs dry again with paper towels—any remaining moisture will prevent proper crisping.
Lightly coat the skin-side of each thigh with 1 tbsp extra-virgin olive oil using your fingers or a paper towel. Then, rub the seasoning mixture all over, pressing it into the meat. Finally, sprinkle 1 tbsp cornstarch evenly over the skin-side only. The cornstarch creates an extra-crispy crust that's impossible to resist. This is where the magic happens for that perfect texture contrast.
Air Fry Until Skin is Deep Golden and Juices Run Clear
Preheat your air fryer to 375°F for 5 minutes—this ensures even cooking from the start. Place the thighs skin-side down in the air fryer basket, leaving about ½ inch between pieces for proper air circulation. Air fry for 12 minutes without touching them. Resist the urge to peek—the heat needs to build properly for that perfect sear.
After 12 minutes, flip the thighs skin-side up and air fry for another 8-10 minutes until the skin is deep golden brown and crispy, and the internal temperature reaches 165°F in the thickest part of the meat. You'll know it's done when the juices run clear when you pierce the thickest part with a meat thermometer. The skin should be so crispy it practically stands up on its own.
Baste with Butter and Rosemary for Rich Flavor
While the chicken finishes cooking, melt 1 tbsp unsalted butter in a small saucepan over low heat. Add the 2 sprigs fresh rosemary and 1 tsp fresh lemon juice, then simmer for 1 minute until fragrant. Remove from heat and let cool slightly.
Once the chicken reaches 165°F, carefully transfer it to a plate and tent loosely with foil. Drizzle the melted butter mixture evenly over the skin-side, letting it soak in for 2-3 minutes. This basting step adds incredible richness and aromatic depth that takes the dish from good to restaurant-quality. The rosemary and lemon brighten the flavors perfectly, cutting through the richness of the crispy skin.
Rest and Serve for Maximum Juiciness
Let the chicken rest for 5-10 minutes before serving—this is crucial for keeping the juices inside where they belong. The thighs will be incredibly tender and the skin will stay crispy if you resist the urge to cut into them immediately. During this time, you can prepare your favorite sides or make a quick pan sauce with the drippings.
Slice into each thigh to reveal juicy, pink meat with a beautiful golden crust. Each bite should deliver that perfect contrast of crispy skin and melt-in-your-mouth tenderness. Serve immediately with lemon wedges on the side if you're feeling fancy—they add a bright contrast to the rich chicken. These thighs are so flavorful and satisfying, they'll become your new go-to weeknight dinner.
Pro Tips For Making Air Fried Bone In Chicken Thighs
- Pat the Skin Dry: Bone-in thighs have a lot of moisture trapped in the skin—wipe it down with paper towels before seasoning. I learned this the hard way when my air fryer just steamed the skin instead of crisping it, no matter how hot I set it.
- Start Hot, Finish Low: Blast those thighs at 400°F (200°C) for the first 12 minutes to sear the skin, then drop to 350°F (175°C) for the last 8–10. After burning three batches at high heat, I finally realized the skin needs a break to crisp properly without turning into charcoal.
- Salt Before You Season: Sprinkle kosher salt first—let it sit for 5 minutes before adding black pepper, garlic powder, and smoked paprika. My grandmother swore by this, and she was right: the salt draws out moisture, so the other spices stick better and the crust forms faster.
- Don’t Overcrowd the Basket: Leave at least ½ inch between thighs—no exceptions. I used to shove them in tightly, and the middle pieces ended up soggy while the outer ones burned. The air needs to circulate, or you’re just air-frying a steamed mess.
Perfect pairings for this air fried bone in chicken thighs
Classic Side Pairings
Creamy mashed potatoes with roasted garlic and a touch of butter make the perfect canvas for these crispy thighs. I like using Yukon Gold potatoes boiled until tender, then mashed with ½ cup warm milk, 4 tbsp butter, and 2 minced garlic cloves.
The smooth texture balances the crispy skin beautifully. 🥔
For a lighter option, try roasted Brussels sprouts with balsamic glaze. Toss halved sprouts with 1 tbsp olive oil, ½ tsp smoked paprika, and salt, then roast at 400°F for 20 minutes.
Finish with a drizzle of balsamic reduction and a sprinkle of crumbled feta for tangy contrast.
Sauce Pairings
A simple honey-mustard dipping sauce elevates these thighs to restaurant quality. Mix 2 tbsp Dijon mustard, 2 tbsp honey, 1 tbsp apple cider vinegar, and 1 tsp fresh thyme. The sweetness cuts through the richness while the mustard adds depth. Serve warm for best results. 🍯
For a smoky twist, try a chipotle-lime crema. Blend ½ cup sour cream, 1 tbsp lime juice, 1 tsp adobo sauce (from canned chipotles), and ½ tsp garlic powder. This sauce adds a creamy, slightly spicy kick that pairs perfectly with the crispy skin.
Beverage Pairings
A crisp lager beer like Peroni or Heineken cleanses the palate between bites. The light, refreshing carbonation contrasts nicely with the rich, crispy chicken. For a non-alcoholic option, sparkling lemonade with fresh mint adds a bright, citrusy note that complements the rosemary and lemon flavors. 🍺
For wine lovers, a dry Riesling from Germany offers the perfect balance. Its crisp acidity and subtle sweetness echo the lemon and honey notes in the sauces while standing up to the bold chicken flavors. Avoid heavy reds—they'll overpower the delicate crispiness.
Global Variations
Transform these thighs into Southern-style fried chicken by adding 1 tbsp hot sauce and ½ tsp cayenne to the seasoning mix. Serve with pickles and buttermilk biscuits for an authentic comfort food experience. 🌶️
For a Mediterranean twist, swap the rosemary for fresh oregano and add 1 tsp dried oregano to the seasoning. Serve with tzatziki sauce, warm pita bread, and chopped cucumbers for a refreshing, flavor-packed meal.
Nutrition facts
Frequently asked questions
Why is dry brining important for air fried bone-in chicken thighs?
The dry brine (salt applied 1-4 hours before cooking) draws out moisture that evaporates during air frying, creating that coveted crispy skin. It also seasons the meat deeply, not just on the surface. Without it, your skin might turn soggy instead of golden and crispy. Think of it as the secret weapon for texture!
Can I use boneless chicken thighs instead of bone-in?
You can, but the cooking time and texture will differ slightly. Boneless thighs cook faster (about 10-12 minutes total at 375°F) and won't have the same juiciness from the bone. For best results, reduce the cornstarch to ½ tbsp since boneless pieces crisp up more easily. The flavor will still be delicious, just a different texture profile.
What if my air fryer doesn't have a preheat function?
No problem! Simply run your air fryer at 375°F for 3-5 minutes before adding the chicken to mimic preheating. This helps establish even heat right away. For extra insurance, place the thighs in the basket and let them cook 2 minutes longer on the first side to compensate for the cooler start. The internal temp is what matters most!
How do I fix chicken that's crispy on the outside but dry on the inside?
This usually happens when the chicken overcooks or isn't rested properly. For future batches, check the internal temp with a meat thermometer—it should reach 165°F but not exceed it. If you've already overcooked, try this quick fix: Slice the thighs and quickly pan-sear them in 1 tbsp butter with 1 tbsp chicken broth for 1-2 minutes to restore moisture. Serve immediately with extra sauce.
Can I make this recipe in a countertop air fryer oven?
Just follow the same steps, but you may need to adjust cooking time slightly. Most countertop air fryer ovens have larger capacities, so space the thighs with 1 inch between them for even airflow. Start checking for doneness at 18 minutes (skin-side down) and 22-24 minutes total. The larger volume means slightly longer cooking overall.