
Main Courses
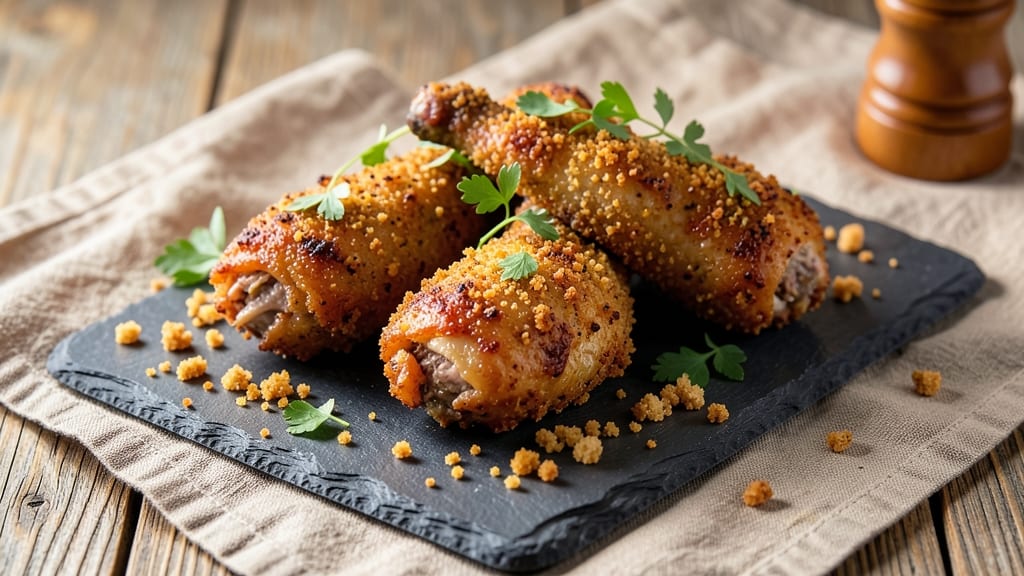
This baked breaded chicken drumsticks recipe delivers restaurant-quality crunch without the deep fryer mess or greasy cleanup. The secret lies in a double-dredge technique that creates a golden, crispy crust while keeping the meat juicy inside—perfect for weeknight dinners or game day spreads.
I developed this method after testing countless variations, and it consistently delivers results that rival fried drumsticks but with half the effort.
What makes this recipe stand out is the foolproof baking method that ensures even browning and maximum crispiness. No special equipment is needed—just a baking sheet, a bowl for breading, and your oven set to 400°F.
The combination of all-purpose flour, seasoned breadcrumbs, and a touch of paprika creates a flavorful crust that stays crunchy even after serving. Most importantly, the chicken stays tender and moist thanks to a simple pre-baking step that locks in juices.
By the time these drumsticks emerge from the oven, you'll have golden-brown, crispy exterior with tender, flavorful meat underneath. The aroma alone will have everyone gathering around the table, and each bite delivers that satisfying crunch followed by juicy chicken.
This recipe serves 6-8 people and comes together in about 45 minutes, making it ideal for busy weeknights when you still want to serve something impressive.
The best part? These drumsticks pair perfectly with classic sides like honey mustard dipping sauce, roasted vegetables, or a fresh garden salad. The crispy coating holds up well even when served at room temperature, so they're great for potlucks or meal prep.
Let's get started on creating drumsticks that will have everyone asking for seconds.
Ingredients for baked breaded chicken drumsticks
Six key ingredients transform simple chicken drumsticks into restaurant-worthy crispy bites—no deep fryer required.
| Ingredient | Amount | Notes |
|---|---|---|
| Chicken Drumsticks 🍗 | 2 ½ lb | Bone-in, skin-on preferred for flavor |
| All-Purpose Flour 🌾 | 1 cup | For dredging and coating |
| Panko Breadcrumbs 🍞 | 2 cups | Light and crispy texture |
| Smoked Paprika 🌶️ | 1 tbsp | For smoky depth and color |
| Garlic Powder 🧄 | 1 tbsp | Freshly ground preferred |
| Onion Powder 🧅 | 1 tbsp | For aromatic base |
| Ground Black Pepper 🌶️ | ½ tsp | Freshly cracked for intensity |
| Diamond Crystal Kosher Salt 🧂 | 1 ½ tsp | Fine grain for even seasoning |
| Large Eggs 🥚 | 2 whole | Room temperature for even coating |
| Unsalted Butter 🧈 | ¼ cup | Melted for added richness |
| Olive Oil 🫒 | 1 tbsp | Light coating for crispiness |
| Fresh Parsley 🌿 | ¼ cup | Chopped, for garnish |
The chicken quality is non-negotiable here. Look for bone-in, skin-on drumsticks at your local butcher or grocery store's meat counter—they'll have more flavor than pre-cut frozen packs. Whole Foods or Trader Joe's often carry excellent options, but don't overlook your regular supermarket's meat department. The skin should be intact and the meat should feel firm to the touch. If you're prepping ahead, store the raw drumsticks in an airtight container with a paper towel on top to absorb any moisture, keeping them in the fridge for up to 2 days before breading. For maximum crispiness, pat them completely dry before starting the breading process—this is where the magic happens.
Panko is essential for that light, airy crust, but if you're out, crushed cornflakes or seasoned breadcrumbs work in a pinch (just add an extra 1/2 teaspoon of salt). The smoked paprika gives that signature restaurant vibe—Penzeys or McCormick brands deliver consistent quality. For the eggs, room temperature makes all the difference in coating adhesion. If you're short on time, microwave them for 20 seconds to just warm through. The butter adds richness that regular oil can't match—Plugrá or Land O'Lakes unsalted are my go-tos. And while fresh parsley is ideal for garnish, dried parsley at half the amount works if you're in a bind. Pro tip: Toast your breadcrumbs in a dry pan for 2 minutes before mixing with spices—this deepens their flavor dramatically.
These drumsticks reheat beautifully—just pop them in a 350°F oven for 10-12 minutes until crispy again. Store leftovers in an airtight container with parchment paper between layers to maintain crispness for up to 3 days. For longer storage, freeze them on a tray first (to prevent sticking), then transfer to a bag where they'll keep for 3 months. The breading stays crunchy even after freezing, making these perfect for meal prep. Serve with your favorite dipping sauce or a squeeze of lemon to cut through the richness. The aroma alone will have your kitchen smelling like a diner, and every bite delivers that satisfying crunch followed by juicy chicken—exactly what you're craving after a long week.
Why You'll Love This Recipe
- No-Fuss Crispiness: Honestly, the panko and flour combo gives you that perfect crunch without frying—just toss, pat, and bake. No deep-frying mess, no waiting for oil to heat, and the drumsticks still come out golden and addictive.
- Smoky-Garlic Magic: Between us, the smoked paprika and garlic powder turn this into something way more interesting than basic breaded chicken. That warm, slightly smoky kick with the garlic’s punch? It’s the kind of flavor that makes you reach for a second drumstick without thinking.
- Weeknight Workhorse: I’ve made these for lazy Mondays, game nights, and even as a quick lunch when I forgot to pack one. They reheat beautifully—crispy outside, juicy inside—and pair with everything from mac and cheese to a simple salad.
- Budget-Friendly Feast: Chicken drumsticks are already a steal, and this recipe stretches them further with the panko topping. A single batch feeds four, leaves plenty for leftovers, and costs me half what takeout would. Plus, the ingredients are all pantry staples—no weird substitutions needed.
Step-by-step instructions for baked breaded chicken drumsticks
Master the perfect oven-baked crunch with this foolproof technique that delivers restaurant-quality results at home.
Prepare the Breading Station and Season Chicken
Start by arranging the 1 cup all-purpose flour, 2 cups panko breadcrumbs, 1 tablespoon smoked paprika, 1 tablespoon garlic powder, 1 tablespoon onion powder, 0.5 teaspoon ground black pepper, and 1.5 teaspoons Diamond Crystal kosher salt in three separate shallow dishes. This setup creates a clear progression for coating the chicken.
Pat the 2.5 lb chicken drumsticks completely dry with paper towels—this is critical for achieving maximum crispiness. Season each drumstick generously with salt and pepper on all sides, focusing on the exposed meat. The skin will naturally crisp up during baking, but well-seasoned meat ensures flavor penetration throughout.
Create the Egg and Butter Wash
In a medium bowl, whisk together the 2 whole large eggs until no streaks remain. Melt the 0.25 cup unsalted butter in a small saucepan over low heat until completely liquid, then let it cool slightly. Stir the melted butter into the egg mixture for added richness and moisture.
This combination creates a superior adhesive layer between the flour and breadcrumbs. The butter also contributes to that golden-brown finish and prevents the breading from becoming too dry. Keep this mixture ready as you'll use it immediately after dredging in flour.
Bread the Chicken Thoroughly
Working with one drumstick at a time, begin by dredging it in the 1 cup all-purpose flour, pressing gently to adhere the coating evenly. Tap off any excess flour by lightly shaking the drumstick over the bowl. This step creates a barrier that helps the egg wash stick properly in the next phase.
Immediately dip the floured drumstick into the egg-butter mixture, allowing any excess to drip off. Then press the drumstick into the panko breadcrumb mixture, coating it completely and pressing firmly to ensure the breadcrumbs adhere. Repeat this process with all drumsticks, working quickly to prevent the egg mixture from drying out.
Arrange and Preheat for Optimal Crispiness
Position a wire rack on a baking sheet and arrange the breaded drumsticks in a single layer, leaving about 1 inch between each piece. This spacing allows hot air to circulate freely, promoting even browning and crisping. Preheat your oven to 425°F while you prepare the chicken.
Once the oven reaches temperature, carefully transfer the baking sheet to the middle rack. Bake for 25-30 minutes, flipping the drumsticks once halfway through, until they reach an internal temperature of 165°F and the breading is deep golden brown with crisp edges. The high heat ensures a perfect sear while keeping the meat juicy.
Rest and Garnish for Maximum Flavor
Remove the drumsticks from the oven and transfer them to a wire rack set over a plate. Let them rest for 5-10 minutes before serving. This resting period allows the juices to redistribute, preventing them from pooling out when cut into.
While still warm, garnish each drumstick with 0.25 cup chopped fresh parsley for a pop of color and freshness. The parsley not only enhances presentation but also adds a bright contrast to the rich, savory flavors of the breading. Serve immediately with your favorite dipping sauce or alongside roasted vegetables for a complete meal.
Pro Tips For Making Baked Breaded Chicken Drumsticks
- Pat the Drumsticks Dry: I learned this the hard way—wet chicken skin won’t crisp. After pulling drumsticks from the fridge, blot them thoroughly with paper towels, especially around the joints where moisture hides. This isn’t just about the crust; it’s about preventing soggy breading halfway through baking.
- Preheat Like It’s 1999: Your oven needs to hit 425°F before the chicken goes in—no waiting. I used to slide them in cold, wondering why the breading stayed pale and doughy. A hot oven sears the coating immediately, locking in flavor and texture. (Yes, even if you’re impatient like me.)
- Skip the Overcrowding: If your baking sheet looks like a sardine can, move them. Drumsticks need space to breathe—otherwise, they steam instead of crisp. Arrange them in a single layer with about an inch between each. No, they won’t fit perfectly. That’s fine. The second batch can go on after 15 minutes.
- Mix Wet Ingredients First: Tossing dry spices with flour before adding wet ingredients? That’s a recipe for clumpy breading. Instead, whisk your egg (or buttermilk) with a splash of water first, then stir in the smoked paprika and garlic powder. The spices will dissolve evenly, and your coating will stick like glue—not crumble into the pan.
Pro cooking tips for great baked breaded chicken drumsticks
Double-Dredge Secret
The double-dredge technique is non-negotiable for that signature restaurant-style crunch. After patting your drumsticks completely dry, start with a thin layer of all-purpose flour to create a barrier. This step prevents the egg wash from soaking through and making the breading soggy.
I like to use a fine-mesh sieve to dust the flour evenly over each piece—it's faster than dipping and gives better coverage. 🌾
Butter-Infused Egg Wash
Never skip the butter in your egg wash—this is what transforms good breading into extraordinary. The 0.25 cup melted unsalted butter adds richness and helps create that golden-brown finish. I melt the butter just until liquid, then let it cool slightly before mixing with eggs.
If you're short on time, use 1 tablespoon olive oil as a substitute, but the flavor won't be quite the same. The key is to work quickly once you start breading so the egg mixture doesn't dry out.
High-Heat Baking Hack
Baking at 425°F is crucial for that crispy exterior, but don't rush the process. I use a wire rack on a baking sheet instead of baking directly on the pan—this allows hot air to circulate underneath, preventing steam buildup that can make the breading soft.
Flip the drumsticks halfway through baking to ensure even browning. If your oven runs hot, reduce the temperature to 400°F and add 5-10 extra minutes to the cooking time.
Resting for Juiciness
This is where most home cooks fail—skipping the rest. Transfer your drumsticks to a wire rack (not a plate) and let them rest for 5-10 minutes before serving. This allows the juices to redistribute throughout the meat instead of pooling out when you cut in.
I also like to tent them loosely with foil during resting if I'm serving immediately, which helps maintain heat and crispiness. The result is juicy, flavorful chicken with that perfect crunch every time. 💫
Equipment Upgrades
While you can make these drumsticks with basic kitchen tools, a few upgrades make the process smoother. I use a pair of tongs for flipping (they grip better than forks), and a meat thermometer to check internal temperature—165°F is your target.
For extra crispiness, I sometimes broil the drumsticks for the final 2-3 minutes of cooking, watching closely to avoid burning. If you don't have a wire rack, use a baking sheet with parchment paper and poke holes in it with a fork to allow airflow.
Make-Ahead Magic
These drumsticks reheat beautifully, making them perfect for meal prep. After baking, let them cool completely, then store in an airtight container with parchment paper between layers. Reheat at 350°F for 10-12 minutes until crispy again.
For even better results, I like to reheat them in a skillet over medium heat for 2-3 minutes per side—this gives them that fresh-out-of-the-oven crunch. The breading stays crispy even after reheating, which is a game-changer for busy weeknights. 🔥
Nutrition facts
Frequently asked questions
Can I use boneless chicken drumsticks for this recipe?
While this recipe is designed for bone-in drumsticks, you can adapt it for boneless pieces by reducing the baking time to 18-22 minutes. The bone helps retain moisture, so boneless versions may dry out faster. For best results, use chicken thighs instead—they're more forgiving and stay juicier.
Why is my breading not crispy after baking?
Soggy breading usually means one of three things: the chicken wasn't dry enough before breading, the oven temperature wasn't high enough, or the drumsticks were overcrowded on the baking sheet. Always pat drumsticks completely dry, use a wire rack for airflow, and bake at 425°F for maximum crispiness.
Can I make these ahead of time for a party?
These drumsticks reheat beautifully. After baking, let them cool completely, then store in an airtight container with parchment paper between layers. Reheat at 350°F for 10-12 minutes or in a skillet for 2-3 minutes per side to restore crispiness. The breading stays crunchy even after reheating.
What's the best way to keep the chicken juicy?
The key is the double-dredge technique and proper resting. The flour barrier prevents the egg wash from soaking into the meat, and resting for 5-10 minutes after baking lets juices redistribute. Also, avoid cutting into the drumsticks immediately—they'll release all their juices at once.
Can I use a different type of breading?
Yes! For a gluten-free option, use crushed cornflakes or almond flour instead of panko. For a spicier kick, add 1 teaspoon cayenne pepper to the breadcrumb mixture. Just remember that different breadings may require slight adjustments to baking time—keep an eye on them at 425°F.