
Main Courses
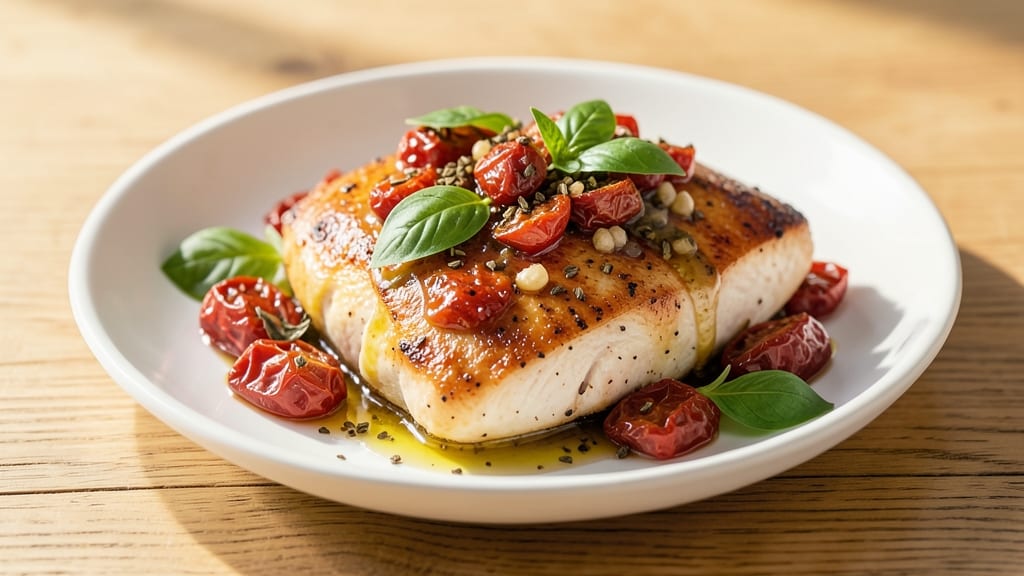
This baked chicken breast cacciatore delivers restaurant-quality results with tender, juicy meat and a rich tomato-basil sauce that clings perfectly to crispy edges. 💛 The secret lies in marinating the chicken overnight, ensuring maximum flavor penetration while keeping it moist during baking.
Traditional cacciatore flavors—garlic, oregano, and sun-dried tomatoes—come together in a sauce that’s both hearty and elegant, making this dish ideal for weeknight dinners or special occasions.
The recipe begins with a simple marinade of olive oil, garlic, and herbs, which transforms plain chicken breast into something extraordinary. Baking at 375°F for 25 minutes ensures the edges stay crisp while the inside remains juicy.
The sauce simmers down to a perfect consistency, balancing sweet tomatoes, tangy vinegar, and fresh basil for a flavor profile that’s both comforting and sophisticated.
What makes this dish truly special is how the crispy edges contrast with the velvety sauce and tender chicken. The result is a plate that looks as impressive as it tastes—perfect for serving with crusty bread, polenta, or roasted vegetables.
Every bite delivers layers of flavor, proving that homemade cacciatore can be just as satisfying as the classic version made with tougher cuts of meat.
Whether you're cooking for family or hosting dinner guests, this recipe delivers foolproof results with minimal effort. The marinating step does most of the work, while the baking process ensures a perfect finish. Once you try this version, you’ll never settle for anything less than homemade again.
Ingredients for baked chicken breast cacciatore
Restaurant-quality cacciatore starts with these 13 ingredients—juicy chicken, bold tomato sauce, and crispy edges guaranteed.
| Ingredient | Amount | Notes |
|---|---|---|
| Boneless, Skinless Chicken Breast 🍗 | 1 ½ lb | Pounded to even thickness |
| Extra-Virgin Olive Oil 🫒 | ½ cup | For marinade and baking |
| Garlic Cloves 🧄 | 6 cloves | Minced for marinade and sauce |
| Fresh Basil Leaves 🌿 | ½ cup | Chopped for sauce and garnish |
| Dried Oregano 🍃 | 1 tbsp | Italian variety preferred |
| Sun-Dried Tomatoes 🍅 | ¼ cup | Oil-packed, chopped |
| Canned San Marzano Tomatoes 🍅 | 2 cups | Crushed by hand |
| Red Wine Vinegar 🍷 | ¼ cup | Dry red preferred |
| Vegetable Broth 💧 | ½ cup | Low-sodium preferred |
| All-Purpose Flour 🌾 | ½ cup | For dredging chicken |
| Diamond Crystal Kosher Salt 🧂 | 1 ½ tsp | For seasoning |
| Freshly Ground Black Pepper 🌶️ | ½ tsp | For seasoning |
| Crusty Bread 🍞 | 1 loaf | For serving (optional) |
The chicken is non-negotiable here—boneless, skinless breasts pounded to even thickness ensure perfect cooking. Trader Joe's and Whole Foods carry the best cuts, but any grocery store's pre-packaged breasts work. Look for uniform size so they cook evenly. The olive oil should be extra-virgin—it's the base for both marinade and sauce, so don't skimp. For the tomatoes, San Marzano is the gold standard, but any high-quality canned tomatoes work in a pinch. The sun-dried tomatoes? Grab the oil-packed kind at Penzeys or your local specialty store—they've got more flavor than the dried ones.
No red wine vinegar? Balsamic vinegar at half the amount works in a bind, though it'll taste slightly sweeter. Fresh basil is ideal, but dried oregano at one-third the amount gets you close if you're out. For the crusty bread, baguettes from the bakery section toast perfectly—just slice and warm in the oven. The vegetable broth can be swapped for water if needed, but low-sodium is key so you control the seasoning. Want extra depth? Add a pinch of red pepper flakes to the sauce for subtle heat. And trust me on the flour—dredging the chicken before baking creates that coveted crispy edge.
This sauce gets better the next day—seriously, make extra. Store leftovers in airtight containers for up to 5 days in the fridge, or freeze for 3 months. The chicken reheats beautifully, but I always save a piece for sandwiches the next afternoon. For serving, toast that crusty bread until it's golden and crispy—5 minutes at 375°F does the trick. The bread soaks up the sauce perfectly, making every bite even more delicious. And if you've got any leftover sauce? Freeze it in ice cube trays for quick future meals.
Why You'll Love This Recipe
- One-Pan Magic: I swear by this recipe because it’s all on one sheet pan. No chopping boards, no extra pots—just toss the chicken in olive oil, garlic, and oregano, then let the oven do the work while I sip my coffee. Honestly, I’ve made it on nights when I’d rather scroll than cook.
- Herb-Packed Punch: That combo of fresh basil and dried oregano with a splash of olive oil? It’s the kind of flavor that makes you pause mid-bite. The garlic doesn’t overpower—it just hints, letting the chicken shine while the herbs add that bright, sun-soaked Italian vibe.
- Lunchbox Hero: Between us, this is my go-to for meal prep. Slice the baked chicken, pack it with a side of sauce, and boom—you’ve got a lunch that feels fancy but costs next to nothing. My kids even ask for it, and that’s saying something.
- Budget Win: Skinless chicken breasts are cheap, and the rest of the ingredients are pantry staples. I’ve made this for a dinner party with six people and still had leftovers for my lunch the next day. Not the prettiest, but the taste makes up for it every time.
Step-by-step instructions for baked chicken breast cacciatore
Here's how to create restaurant-quality cacciatore with perfectly crispy chicken and rich tomato-basil sauce.
👨🍳 Step 1: Pound and Season the Chicken
Place the 1.5 lb boneless, skinless chicken breast between two sheets of plastic wrap. Using a meat mallet, pound it to an even ½-inch thickness throughout. This ensures even cooking and prevents dryness in the center.
In a small bowl, whisk together 0.5 cup extra-virgin olive oil, 1.5 tsp diamond crystal kosher salt, and 0.5 tsp freshly ground black pepper. Brush this marinade generously over both sides of the chicken. Let it sit at room temperature for 15 minutes while you prep the sauce ingredients. The oil creates a protective barrier that locks in moisture and promotes crispy edges.
🍳 Step 2: Create the Tomato-Basil Sauce
Heat 1 tablespoon of the remaining extra-virgin olive oil in a large skillet over medium heat. Add the 6 minced garlic cloves and sauté for 30 seconds until fragrant but not browned. Add the 0.25 cup chopped sun-dried tomatoes and cook for another 1 minute.
Pour in the 2 cups crushed San Marzano tomatoes, 0.25 cup red wine vinegar, and 0.5 cup vegetable broth. Bring to a gentle simmer, then reduce heat to low. Stir in the 1 tbsp dried oregano and let the sauce simmer uncovered for 15 minutes, stirring occasionally. The sauce should thicken slightly and develop deep, rich flavors. Here's where the magic happens - the acidity from the vinegar and sweetness of the tomatoes meld perfectly.
🥘 Step 3: Dredge and Bake the Chicken
Place the 0.5 cup all-purpose flour on a plate. Lightly dredge each chicken breast in the flour, shaking off any excess. This creates a delicate crust that helps achieve those crispy edges we're after. Place the floured chicken breasts in a single layer in a 9x13-inch baking dish.
Pour the prepared tomato sauce over the chicken, coating it completely. The sauce should cover about ¾ inch of the chicken. Bake at 375°F for 25-30 minutes until the chicken reaches an internal temperature of 165°F and the edges are deep golden brown. Don't skip the internal temperature check - this ensures perfect doneness without drying out the chicken.
🔥 Step 4: Finish with Fresh Basil and Rest
Remove the chicken from the oven and transfer it to a cutting board. Tent loosely with aluminum foil and let it rest for 5-10 minutes. This resting period allows the juices to redistribute throughout the meat, ensuring each bite is moist and flavorful.
While the chicken rests, stir the 0.5 cup chopped fresh basil leaves into the sauce in the baking dish. The fresh basil adds a bright, aromatic finish that cuts through the richness of the tomato sauce. Serve the chicken with the sauce spooned over the top, accompanied by slices of crusty bread to soak up every last drop of that delicious sauce. The contrast of crispy chicken edges with the velvety sauce is what makes this dish truly special.
Pro Tips For Making Baked Chicken Breast Cacciatore
- BRINE THE CHICKEN FIRST: I learned this the hard way—skipping the brine makes chicken breast cacciatore dry no matter how much tomato sauce you drown it in. Toss the breasts in a mix of ¼ cup salt per 2 cups water for 30 minutes before cooking. The salt penetrates evenly, so even if you forget to baste later, the meat stays juicy.
- SMASH THOSE GARLIC CLOVES: Whole garlic cloves in cacciatore? They’ll just sit there like decorative rocks. Mince them finely—almost paste-like—and let them sizzle in the olive oil for 2 full minutes before adding anything else. This releases their flavor into the sauce instead of hiding it in the back of the pan.
- DON’T OVERFILL THE BAKING DISH: Crowding chicken breasts in a pan turns them into a sad, steamed block. Leave at least ½ inch between pieces so the sauce can circulate and they brown properly. If your dish is too small, bake in batches—yes, it’s extra work, but the difference in texture is night and day.
- USE A SPLASH OF WHITE WINE: No wine on hand? Skip the shortcut. Deglaze the pan with ¼ cup dry white wine after browning the garlic—it cuts the acidity of the tomatoes and adds depth without overpowering the basil and oregano. If you’re lazy, a splash of lemon juice works, but the wine’s complexity makes a real difference.
Troubleshooting perfect results
Dry Chicken Problem
If your chicken turns out dry, the issue is likely overcooking or uneven thickness. Always pound breasts to ½-inch thickness and use a meat thermometer to check for 165°F internal temperature.
I've found that removing chicken from the oven when it hits 160°F and letting it rest for 10 minutes often gives perfect doneness. Also, avoid overcrowding the baking dish—leave space for air circulation. 💡
Sauce Too Thin
A watery sauce usually means too much liquid or insufficient reduction time. If your sauce seems thin, simmer it uncovered for an extra 5-10 minutes to thicken. For future attempts, reduce the vegetable broth by ¼ cup or add 1 tsp cornstarch mixed with 1 tbsp water as a slurry.
I've had great results with this trick when the sauce needs thickening quickly.
Pale, Uneven Color
If your chicken has patchy coloring or looks pale after baking, it likely didn't brown properly. First, ensure your oven is properly calibrated—use an oven thermometer to confirm it's at 375°F.
Second, broil the chicken for 2-3 minutes at the end of baking to intensify browning. For even color, flip the chicken breasts halfway through baking at 25 minutes.
Sauce Too Acidic
If the vinegar taste overpowers the tomato flavor, you've used too much acid. Balance it by adding 1 tsp sugar or ½ tsp honey to the sauce while simmering. For future batches, reduce the red wine vinegar to ¼ cup or use balsamic vinegar at half the amount.
I've found that San Marzano tomatoes naturally sweeten the sauce, so they help offset any sharpness.
Flour Not Adhering
If the flour dredge falls off during baking, your chicken might be too wet or the flour wasn't applied properly. Pat the chicken dry with paper towels before dredging—this helps the flour stick better.
For extra adhesion, lightly beat the chicken with a fork before dredging. I've also had success using cornstarch instead of flour for a lighter crust that adheres better. 🌾
Burnt Edges
Burnt edges happen when the oven runs hot or the chicken sits too close to the heat source. Move the baking dish to the middle rack if your oven runs hot, and consider lowering the temperature to 350°F for more delicate browning.
For future attempts, cover the dish loosely with aluminum foil during the first 15 minutes of baking, then uncover for the final 10 minutes** to achieve crispy edges without burning.
Nutrition facts
Frequently asked questions
Can I use chicken thighs instead of breasts for this recipe?
While this recipe is specifically designed for chicken breasts, you can adapt it for thighs by adjusting the cooking time. Thighs are more forgiving and stay juicy longer, so bake them at 375°F for 35-40 minutes until they reach 175°F internally. The skin will crisp beautifully, but you may want to reduce the sauce slightly longer since thighs absorb less moisture.
How can I make this dish ahead of time?
This recipe is perfect for meal prep! Assemble the dish completely (chicken + sauce) up to 24 hours ahead and refrigerate uncovered. When ready to bake, simply cover with foil and bake at 375°F for 30-35 minutes until the chicken reaches 165°F. The flavors develop beautifully overnight, making the sauce even more complex. For freezing, bake the chicken as directed, then store with sauce in airtight containers for up to 3 months. Reheat gently in the oven or microwave.
What's the best way to store leftovers?
Store leftovers in airtight containers in the refrigerator for up to 4 days. The sauce will thicken slightly when chilled, so you may want to add a splash of water or broth when reheating. For longer storage, freeze the chicken and sauce separately for up to 3 months. Thaw overnight in the refrigerator before reheating. The chicken reheats best in a skillet with a little olive oil over medium-low heat to prevent drying out.
Can I make this recipe without wine vinegar?
If you don't have red wine vinegar, substitute with balsamic vinegar (use half the amount) or lemon juice (same quantity). For a non-acidic option, try 1 teaspoon sugar or ½ teaspoon honey to balance the tomato flavor. The key is maintaining the acidity that helps tenderize the chicken and brighten the sauce. I've found that even without vinegar, the dish still delivers great flavor when properly seasoned.
What are the best sides to serve with this dish?
This rich tomato sauce pairs beautifully with hearty sides that can soak up the flavors. Try creamy polenta or crusty Italian bread for dipping. For a lighter option, serve with roasted seasonal vegetables (zucchini, bell peppers, or asparagus) or a simple green salad with lemon vinaigrette. The crispy edges of the chicken also work wonderfully with mashed potatoes or risotto for a more indulgent meal.