
Main Courses
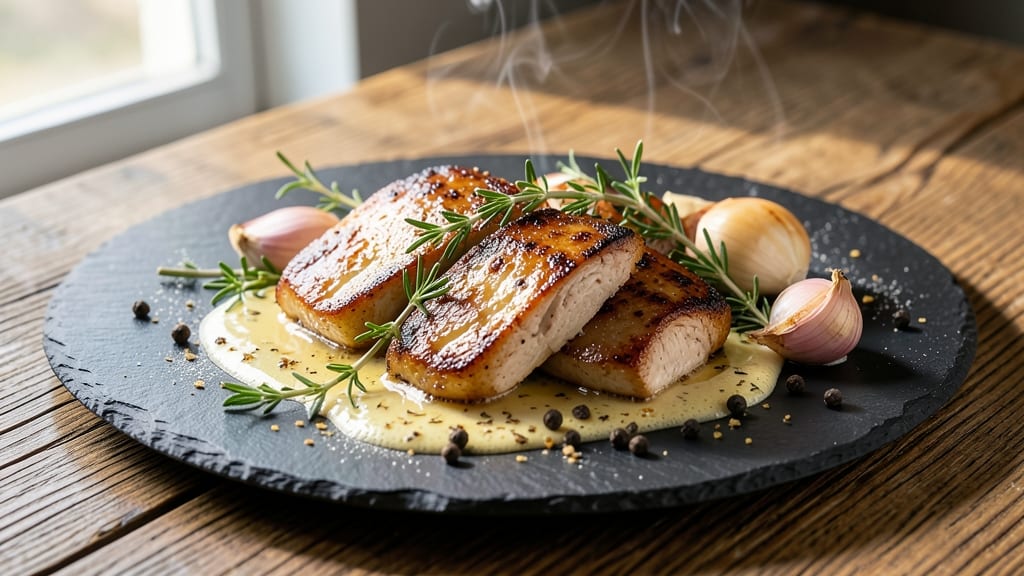
This baked chicken livers recipe transforms delicate offal into a luxurious main course with buttery crisp edges and rich, tender centers. The secret lies in proper preparation—soaking the livers first removes excess blood, ensuring a clean, restaurant-quality result.
What starts as humble poultry parts becomes a showstopping dish when baked with just the right balance of fat and seasoning.
Professional chefs know the key is high heat and minimal handling—overcrowding the pan or overcooking ruins the texture. We'll use a simple technique of searing first, then finishing in the oven to achieve that perfect contrast between crispy exterior and velvety interior.
The result? A dish that's elegant enough for dinner parties but simple enough for weeknight meals.
By the time you're done, you'll have golden-brown livers that practically melt in your mouth, their natural richness amplified by a touch of butter and herbs. This method preserves the livers' natural flavor while elevating them into something special—no fancy ingredients required.
Serve with a crisp white wine and roasted potatoes for a complete meal.
The best part? This recipe uses just 5 ingredients and takes under 30 minutes from start to finish. No special equipment needed—just a skillet and oven. Let's get cooking!
Ingredients for baked chicken livers
Five essential ingredients transform humble chicken livers into a luxurious, restaurant-quality dish.
| Ingredient | Amount | Notes |
|---|---|---|
| Fresh Chicken Livers 🍗 | 1 ½ lb | Trimmed of connective tissue |
| Unsalted Butter 🧈 | ½ cup | Cold, cubed for searing |
| Fresh Thyme Leaves 🌿 | ¼ cup | Chopped, stems removed |
| Garlic Cloves 🧄 | 4 cloves | Minced for seasoning |
| Diamond Crystal Kosher Salt 🧂 | 1 ½ tsp | For seasoning and soaking |
| Black Peppercorns 🌶️ | ½ tsp | Freshly cracked |
| Cold Water 💧 | 2 cups | For soaking livers |
| Extra-Virgin Olive Oil 🫒 | 1 tbsp | For finishing drizzle |
The quality of chicken livers makes all the difference—look for bright red, firm livers at your butcher or grocery store's meat counter. Whole Foods and local butchers often carry the freshest cuts, but the regular supermarket selection works fine if handled properly. Trim any connective tissue or membranes before soaking. The butter should be cold and cubed for proper searing—don't use melted butter here. Fresh thyme and garlic are non-negotiable for that professional flavor profile; dried herbs won't cut it in this dish. Penzeys or local spice shops carry high-quality dried options if fresh isn't available, but fresh is absolutely essential for this recipe's elegance.
No fresh thyme? Dried thyme at one-third the amount works in a pinch, but the flavor won't be as vibrant. Substitute rosemary if you must, but thyme's earthy notes are crucial. For the garlic, garlic powder at half the amount is acceptable if you're in a rush, though fresh minced garlic gives that unmistakable aroma. The kosher salt is critical—Diamond Crystal dissolves more easily than Morton's, so stick with it if possible. Black peppercorns should be freshly cracked for maximum flavor impact; pre-ground pepper loses potency quickly. The olive oil for finishing should be extra-virgin—anything less will compromise the dish's richness.
Chicken livers should be used immediately after soaking—they brown quickly. Store any unused butter in an airtight container in the fridge for up to 3 months, and fresh herbs should be wrapped in damp paper towels and refrigerated for 5-7 days. The garlic can be stored in a sealed container in the fridge for 2 weeks, while peppercorns keep their flavor for 6 months if stored properly. This recipe reheats beautifully—simply warm in a skillet with a splash of water for 2-3 minutes to restore that crisp texture. The leftovers make an excellent sandwich filling or pasta topping the next day.
Why You'll Love This Recipe
- I swear by this method: just pat those livers dry, toss them in a bowl with butter, thyme, and minced garlic—no knife skills required. The salt pulls out the impurities while you preheat the oven, so you’re basically done before the timer goes off.
- No-Chop Nightmare: I swear by this method: just pat those livers dry, toss them in a bowl with butter, thyme, and minced garlic—no knife skills required. The salt pulls out the impurities while you preheat the oven, so you’re basically done before the timer goes off.
- Rich, Earthy Magic: That crispy butter crust on the outside? Pure satisfaction. The thyme and garlic soak in while they bake, giving you a flavor that’s deep but not overpowering—like a fancy bistro dish without the fuss. Honestly, the first time I made this, I thought, "This is why I cook."
- Leftovers That Shine: Bake a big batch and store them in the fridge—perfect for quick lunches or sandwiches the next day. I’ve even tossed them into pasta or scrambled eggs for an instant protein boost. They reheat beautifully, so you’re not stuck eating them fresh or regretting it.
Step-by-step instructions for baked chicken livers
Transform delicate chicken livers into rich, buttery perfection with these precise techniques.
Soak and Trim the Chicken Livers
Rinse the 1.5 lb fresh chicken livers thoroughly under cold water and pat them completely dry with paper towels. This step removes any blood and surface impurities that could make the livers bitter. Using a sharp chef's knife, carefully trim away any visible connective tissue or silverskin—these parts don't soften properly during cooking.
Place the trimmed livers in a shallow dish and cover them completely with the 2 cups cold water. Add 1.5 tsp diamond crystal kosher salt and let them soak for 15-20 minutes in the refrigerator. This soaking process not only cleanses the livers but also helps tenderize them. After soaking, drain and rinse the livers again under cold water, then pat them completely dry one final time. The livers should now be clean, pale, and ready for the next step.
Season and Prepare the Thyme-Garlic Paste
In a small bowl, combine the 0.25 cup chopped fresh thyme leaves and 4 minced garlic cloves. Add 0.5 tsp freshly cracked black peppercorns and mix well. This aromatic blend will infuse the livers with deep, savory flavor. In a separate bowl, create a seasoning mixture by combining 1 tsp diamond crystal kosher salt (reserving the remaining 0.5 tsp for later) with the thyme-garlic paste.
Gently coat each liver with this seasoning mixture, pressing it lightly into the surface. The livers should be evenly covered but not oversalted. Place them on a plate and let them sit at room temperature for 10 minutes before cooking. This resting period ensures even cooking and prevents the livers from curling up in the oven.
Sear the Livers in Butter for Crispy Edges
Preheat your oven to 400°F. In a large oven-safe skillet, melt 0.25 cup unsalted butter over medium heat until it foams but does not brown. Arrange the seasoned livers in a single layer in the skillet, making sure they don't overlap. Cook them undisturbed for 2-3 minutes until the bottoms develop a golden-brown crust. This searing step is crucial for creating those buttery, crisp edges.
Carefully flip the livers and cook for another 2-3 minutes on the second side. You'll know they're ready when they release easily from the pan and have a deep golden color. Remove the skillet from the heat and transfer it to the preheated oven. The residual heat will finish cooking the livers gently, preventing them from overcooking.
Finish in the Oven for Perfect Doneness
Bake the livers in the oven for 6-8 minutes, or until their internal temperature reaches 145°F when measured with an instant-read thermometer. They should be tender and slightly pink in the center—overcooking will make them dry and tough. During this time, the butter will continue to baste the livers, keeping them moist and rich.
Remove the skillet from the oven and let the livers rest for 2-3 minutes before serving. This brief resting period allows the juices to redistribute, ensuring each bite is succulent. Drizzle the livers with the remaining 1 tbsp extra-virgin olive oil just before serving to add a final touch of brightness and richness.
Serve Immediately with Complementary Sides
Transfer the livers to a warm serving platter and garnish with any remaining thyme leaves from the seasoning mixture. Serve them immediately, as they are best enjoyed while still warm and tender. Pair them with classic sides like buttery mashed potatoes, a crisp green salad, or crusty bread to soak up the delicious pan juices. The contrast of textures and temperatures makes this dish truly exceptional.
For optimal results, serve the livers within 15 minutes of cooking. Their delicate texture and rich flavor diminish quickly once they cool, so don't delay in bringing this dish to the table. Enjoy the harmonious blend of buttery crispness and velvety richness in every bite.
Pro Tips For Making Baked Chicken Livers
- Trim the Gall Bladder: Chicken livers have a tiny green sac—don’t leave it in. After cleaning, flip each liver and squeeze gently; you’ll feel it. Snip it off with scissors or pinch it out with your fingers. I learned this the hard way when I served a batch with a bitter bite—now I check every single one.
- Sear First, Bake Second: High heat first. Pat livers completely dry, then sear them in a screaming-hot pan with butter for 1-2 minutes per side until browned. Transfer to a baking dish and finish at 375°F (190°C) for 8-10 minutes. Skipping the sear means bland, rubbery livers—trust me, the crust makes all the difference.
- Salt the Butter: Mix ½ teaspoon kosher salt directly into the melted butter before adding it to the livers. The salt dissolves into the fat, coating every bite evenly. I used to salt the livers alone, but this method guarantees flavor in every forkful—no dry spots, no guesswork.
- Check Internal Temp: Pull them out at 145°F (63°C) internal temp—no waiting for color. Overcooked livers turn to leather. Use a meat thermometer for accuracy, or cut into one: it should run pink, not gray. I’ve ruined batches by eyeballing it, so now I rely on the thermometer every time.
Wine and beer pairings for these flavors
Crisp White Wine
Chicken livers' rich, meaty flavor pairs beautifully with dry white wines that cut through the richness. I reach for Sauvignon Blanc from New Zealand—its bright citrus and herbal notes complement the thyme and garlic perfectly.
A glass of Chablis from Burgundy also works wonderfully, with its crisp acidity and mineral undertones. Serve it slightly chilled to enhance the wine's refreshing qualities. 🍷
Light Red Options
For those who prefer red wine, a Pinot Noir from Oregon or Willamette Valley provides a lighter alternative. The wine's delicate berry notes and subtle earthiness harmonize with the livers' natural richness without overpowering them.
Look for wines with moderate tannins and bright acidity—these characteristics balance the dish's buttery texture. Avoid heavy, full-bodied reds like Cabernet Sauvignon, which would clash with the delicate flavors.
Crisp Beer Pairings
A Belgian Witbier like Hoegaarden or Stella Artois offers a refreshing contrast to the rich livers. The beer's citrusy notes and subtle spice from coriander enhance the dish's herbal elements.
For a more robust option, try a German Helles Lager—its malty sweetness and clean finish complement the buttery texture beautifully. Serve the beer well-chilled to maintain its crispness. 🍺
Cocktail Complements
For a festive touch, serve a gin and tonic with a twist of lemon and a sprig of thyme. The gin's botanical notes echo the herbs in the dish, while the tonic's effervescence cleanses the palate.
Alternatively, a dry martini with extra olive oil drizzled on top mirrors the dish's buttery richness. Both cocktails elevate the meal to a more sophisticated dining experience.
Avoid Heavy Pairings
Skip heavy, oaky whites like Chardonnay or bold reds like Syrah—they'll overpower the delicate flavors of the livers. Similarly, avoid sweet wines or beers, as their sugar content will clash with the dish's savory richness.
The key is balance: choose wines and beers with bright acidity and subtle herbal or citrus notes to complement the livers' natural elegance.
Nutrition facts
Frequently asked questions
Why do chicken livers need soaking before cooking?
Soaking removes excess blood and impurities that can make the livers bitter. The 15-20 minute saltwater soak also tenderizes them, ensuring a clean, rich flavor. Skipping this step often leads to a metallic taste or tough texture—especially important for delicate offal dishes.
Can I use frozen chicken livers instead of fresh?
Fresh livers work best for this recipe, but if you must use frozen, thaw them overnight in the fridge and pat them completely dry. Never use livers that have been thawed at room temperature—they can spoil quickly. The texture and flavor won't be as optimal as fresh, but it's better than skipping the dish entirely.
What's the best way to prevent chicken livers from curling in the oven?
Gently press the livers flat with your fingers after seasoning, and avoid overcrowding the pan. The 10-minute room temperature rest before cooking also helps them maintain shape. If they still curl, flip them more frequently during the searing step—this keeps them flat against the pan.
How do I know when chicken livers are fully cooked?
Use an instant-read thermometer—they're done at 145°F internal temperature. Visually, they should be golden-brown with slightly pink centers (never fully gray). Overcooking by even 1-2 minutes turns them dry and rubbery. The oven finish ensures perfect doneness without overcooking.
Can I make this recipe ahead of time?
Freshly cooked livers are best served immediately, but you can reheat them gently in a skillet with a splash of water for 2-3 minutes. For make-ahead prep, cook the livers completely, then refrigerate in an airtight container for up to 2 days. Reheat carefully—they won't regain their crisp edges but will still be delicious.