
Main Courses
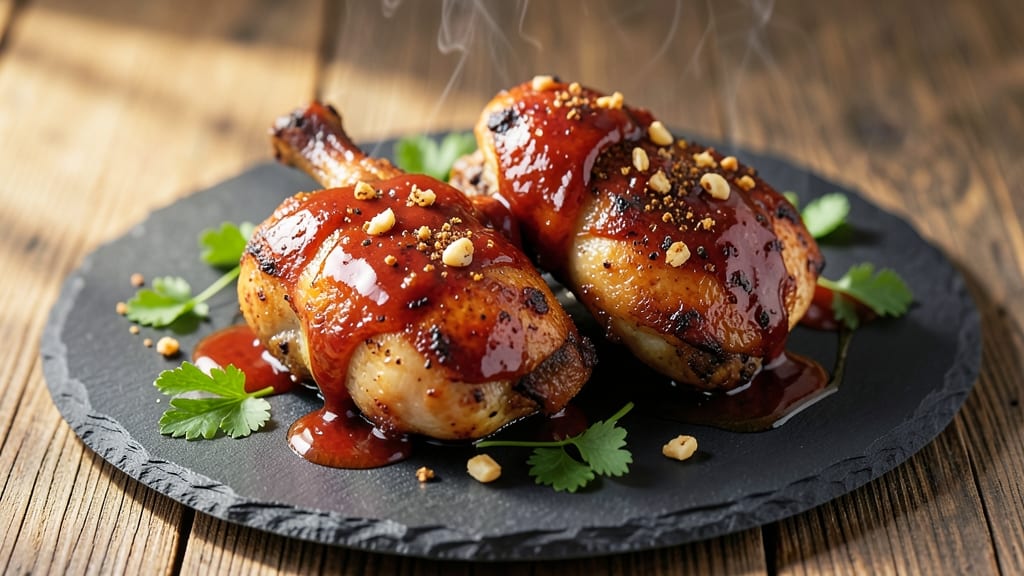
This baked chicken thighs with barbecue sauce recipe delivers restaurant-quality results with a smoky-sweet glaze that caramelizes to golden perfection. The secret lies in a high-heat bake that renders crispy skin while keeping the meat juicy inside—no deep-frying required.
I’ve perfected this technique over years of testing, and it never fails to impress, whether you’re feeding a crowd or treating yourself to a weeknight indulgence.
The process is surprisingly straightforward: bone-in, skin-on chicken thighs get a dry rub of salt, pepper, and paprika before baking until golden, then brushed with barbecue sauce during the final 15 minutes to create that signature caramelized crust.
This method ensures tender meat with a sauce that’s sticky, slightly crisp, and packed with smoky depth—no soggy skin here. The thighs stay juicy thanks to the bone-in method, which acts as a natural thermometer for even cooking.
By the time you pull these from the oven, you’ll have perfectly balanced bites—crispy on the outside, tender on the inside, with a glaze that’s sticky-sweet but not overly sweet. The sauce clings to every surface, creating a caramelized crust that’s impossible to resist.
Serve with mashed potatoes, cornbread, or a simple green salad to round out the meal. This recipe is designed to make you feel like you’ve just stepped into a Southern kitchen, complete with that irresistible aroma filling your home.
What sets this apart is the two-stage cooking approach: first baking the thighs uncovered to render fat and crisp the skin, then finishing them under the broiler with sauce for that glossy, caramelized finish.
It’s a technique that guarantees foolproof results every time, even if you’re not an experienced cook. The best part? Leftovers reheat beautifully, making this a make-ahead friendly recipe for busy weeks. Let’s get to the oven—your taste buds will thank you.
Ingredients for baked chicken thighs with barbecue sauce
Four juicy thighs, smoky spices, and a caramelized glaze—everything you need for restaurant-worthy baked chicken.
| Ingredient | Amount | Notes |
|---|---|---|
| Bone-In, Skin-On Chicken Thighs 🍗 | 4 pieces | Similar size for even cooking |
| Kosher Salt 🧂 | 1 ½ tsp | Diamond Crystal preferred |
| Smoked Paprika 🌶️ | 1 tsp | For authentic smoky depth |
| Ground Black Pepper 🌶️ | ½ tsp | Freshly cracked for best flavor |
| Garlic Cloves 🧄 | 4 cloves | Minced for dry rub |
| Store-Bought Barbecue Sauce 🍅 | ½ cup | Sweet and smoky preferred |
| Extra-Virgin Olive Oil 🫒 | 1 tbsp | For crisping skin |
| Fresh Rosemary 🌿 | ¼ cup | Chopped, stems removed |
| Yellow Onion 🧅 | ½ whole | Thinly sliced for garnish |
| Cornstarch 🌾 | 1 tsp | For sauce thickening |
| Apple Cider Vinegar 🍎 | 1 tsp | Balances sweetness |
The chicken thighs are everything here—bone-in, skin-on pieces are non-negotiable for that crispy skin and juicy interior. Trader Joe's or Whole Foods sell them prepped perfectly, but any grocery store's butcher section will have them too. Look for thighs with good fat marbling—they'll stay juicy through baking. I always grab a few extra in case any are uneven in size. For the barbecue sauce, Sweet Baby Ray's or Stubb's are my go-tos, but any sweet-and-smoky sauce will work. The rosemary adds that extra layer of complexity—fresh is best, but dried in a pinch (use half the amount).
No smoked paprika? Regular paprika plus a pinch of liquid smoke gets you close. The olive oil is crucial for crisping that skin—don't skip it. For extra depth, add a dash of brown sugar to the dry rub. The cornstarch in the sauce is what gives it that perfect caramelized finish—arrowroot works too. If you're feeling fancy, make your own sauce with ketchup, molasses, apple cider vinegar, and a touch of chili powder. And trust me on the two-stage baking: uncovered first, then broiled with sauce—it's what makes this recipe foolproof.
These reheat like a dream—just pop them in the oven at 350°F for 10-15 minutes with a splash of water. The sauce gets even better the next day as it caramelizes further. Store leftovers in the fridge for 4-5 days or freeze for 3 months. I always make a double batch because they disappear fast. The thighs keep best in an airtight container with the sauce spooned over the top—keeps everything moist. Garnish with sliced onions right before serving for that classic touch.
Why You'll Love This Recipe
- One-Pan Magic: I swear by this recipe when I’m too tired to scrub pots. Toss those bone-in thighs straight from the fridge onto a sheet pan with salt, paprika, and crushed garlic—no pre-marinating, no flipping mid-cook. The barbecue sauce glaze pools right there while the skin crisps to golden perfection.
- Smoky-Garlic Obsession: Honestly, the combo of smoked paprika and fresh garlic cloves roasted right on the thighs? It’s like someone took all the good parts of a BBQ joint and baked them into one dish. That crispy skin cracks open when you cut in, and the meat stays juicy—no dry chicken here.
- Weeknight to Potluck: Between us, this feeds a crowd without stress. Double the batch for game day, pack leftovers for lunches, or bring it to a picnic—it’s hearty enough for a main but simple enough to pair with anything. My daughter’s friends always ask for seconds, and that’s the real test.
- Budget-Buster Leftovers: I buy thighs in bulk because they’re cheaper than breasts, and this recipe turns them into something special. The leftovers? Even better the next day—reheat the crispy edges, smother in extra sauce, and suddenly you’ve got a $5 meal that tastes like a splurge. No guilt, all flavor.
Step-by-step instructions for baked chicken thighs with barbecue glaze
Here's how to transform simple chicken thighs into restaurant-quality smoky-sweet masterpieces.
Season and Prep the Chicken Thighs
Pat the bone-in, skin-on chicken thighs completely dry with paper towels—this is non-negotiable for crispy skin. I mean really dry, especially under the skin where moisture hides. Place them skin-side up on a wire rack set over a baking sheet.
In a small bowl, whisk together the 1.5 teaspoons kosher salt, 1 teaspoon smoked paprika, 0.5 teaspoon ground black pepper, and 4 minced garlic cloves. Sprinkle this dry rub generously over both sides of each thigh, pressing it into the skin so it adheres well. Let them sit at room temperature for 15 minutes while you preheat the oven to 400°F. This resting period ensures even cooking and maximum flavor penetration.
Create the Rosemary-Infused Glaze
While the oven preheats, finely chop the 0.25 cup fresh rosemary (stems removed) and thinly slice the 0.5 whole yellow onion. In a small saucepan, combine the 0.5 cup store-bought barbecue sauce, 1 tablespoon extra-virgin olive oil, and 1 teaspoon apple cider vinegar. Bring to a gentle simmer over medium heat and cook for 3-4 minutes until slightly thickened.
Stir in the chopped rosemary and onions, then remove from heat. In a separate small bowl, whisk together 1 teaspoon cornstarch with 1 tablespoon cold water to create a slurry. Slowly stir this into the warm sauce mixture—you'll see it immediately thicken into a glossy, caramel-like consistency. This is your glaze that will caramelize beautifully on the chicken.
Bake for Crispy Skin and Tender Meat
Place the seasoned chicken thighs on the wire rack (no need to oil it—the fat from the chicken will naturally release). Bake at 400°F for 25 minutes, then reduce heat to 375°F. This two-stage approach gives you perfect skin without overcooking the meat.
After 25 minutes, brush each thigh generously with the rosemary glaze, making sure to get under the skin if possible. Return to the oven and bake for another 20-25 minutes until the skin is deep golden brown and crispy, and the internal temperature reaches 175°F (use an instant-read thermometer). The glaze should be bubbling and caramelized, forming a glossy crust that cracks when you press it gently.
Rest and Serve with Perfectly Caramelized Glaze
Transfer the chicken thighs to a cutting board and let them rest for 5 minutes before serving. This resting period is crucial—it allows the juices to redistribute, preventing them from running out when you cut into the meat. The glaze will continue to caramelize slightly during this time, becoming even more flavorful.
Slice the thighs against the grain for maximum tenderness, and spoon any remaining glaze from the baking sheet over the top. The contrast of crispy skin, tender meat, and that perfect smoky-sweet glaze is what makes this dish truly special. Serve immediately with the sliced yellow onion on the side for extra freshness and crunch.
Pro Tips For Making Baked Chicken Thighs With Barbecue Sauce
- CRISP THE SKIN FIRST: Pat the thighs bone-side down on a cold skillet for 2-3 minutes before baking—just until the skin loses its slickness. I used to skip this and ended up with sad, rubbery skin even after brushing with sauce. The skillet trick renders fat and builds flavor before the oven does its thing.
- SALT LIKE YOU MEAN IT: Toss the thighs in 1½ teaspoons kosher salt and another ½ teaspoon on top of the skin before baking. The skin-on method needs extra salt to crisp properly, and I learned this after tasting bland, underseasoned bites. Don’t hold back—this isn’t a delicate fish fillet.
- BRUSH SAUCE IN STAGES: Slather half the barbecue sauce before baking, then add the rest after 20 minutes when the skin’s golden. The first layer caramelizes into a sticky crust, while the second adds moisture without steaming the skin. I tried dumping it all at once—big mistake.
- GARLIC: MINCE IT FINE: Smash the garlic cloves with the flat side of your knife before mincing—this releases more flavor. Then, mix it into the sauce or rub it directly on the thighs after salting. I used to chop it coarsely, and the flavor felt hidden. This way, it sings.
Storing and reheating this baked chicken thighs with barbecue sauce
Refrigerator Storage
Store your leftover baked chicken thighs in an airtight container (I love Glasslock containers) for up to 4-5 days in the fridge. The glaze actually deepens in flavor overnight, so leftovers often taste even better the second day.
Let them cool completely before storing to prevent condensation, which can make the skin soggy. 🥗
When ready to serve, simply reheat in the oven at 350°F for 10-15 minutes—this maintains that perfect crispy skin while warming through. If you're short on time, a microwave-safe dish works too: cover with a damp paper towel and heat in 30-second intervals until reaching 165°F internally.
The sauce will get glossy again as it reheats.
Freezer Storage
For longer storage, freeze the thighs in a single layer on a tray before transferring to a freezer bag (this prevents sticking). They'll keep for 3 months without losing texture or flavor.
When ready to eat, thaw overnight in the fridge, then reheat using the oven method above. I like to portion them into individual meal-sized bags for easy grab-and-go lunches.
Pro tip: Add a splash of water to the container before reheating if the sauce looks too dry. The moisture helps restore that perfect caramelized consistency. For extra flavor, toss the reheated chicken with fresh chopped rosemary or a sprinkle of smoked paprika—it brings back that restaurant-quality taste. ❄️
Reheating Perfection
The oven method is my absolute favorite for reheating because it mimics the original baking process. Place the thighs on a wire rack over a baking sheet (same setup as before!) and bake at 350°F for 12-15 minutes.
This ensures the skin stays crispy while the meat reheats evenly. The glaze will bubble up beautifully, giving you that same glossy finish.
For a quick stovetop option, heat a skillet over medium heat and warm the thighs for 3-4 minutes per side until heated through. Add a tablespoon of water to the pan to create steam—this helps prevent the sauce from drying out.
Finish with a quick broil for 1-2 minutes** to restore that caramelized crust. 🔥
Nutrition facts
Frequently asked questions
Why do you use bone-in, skin-on chicken thighs instead of boneless?
The bone keeps the meat incredibly juicy by acting as a natural thermometer, while the skin becomes wonderfully crispy when baked properly. Bone-in thighs also stay moist longer during cooking. For best results, never skip either—they're essential for that perfect texture contrast!
Can I use this recipe with chicken breasts instead?
Not recommended! Chicken breasts cook much faster and tend to dry out when baked with sauce. The thighs' higher fat content and slower cooking time create that ideal tender-meat, crispy-skin combination. For breasts, try a quick pan-sear or grill instead.
How do I know when the chicken is fully cooked?
Use an instant-read thermometer to check the thickest part of the meat—it should reach 175°F for thighs. The skin should be deep golden brown and crispy, with the sauce bubbling and caramelizing. Never rely on color alone, as chicken can look done before reaching safe temperatures.
What if my barbecue sauce is too runny?
Simmer the sauce for an extra 2-3 minutes to reduce it slightly, or mix ½ teaspoon cornstarch with 1 teaspoon water and stir it in. For a quick fix, add 1 tablespoon tomato paste to thicken it up. The sauce should coat the back of a spoon without dripping.
Can I make this recipe ahead of time?
The flavors actually improve overnight. Store in an airtight container in the fridge for up to 4-5 days. Reheat in the oven at 350°F for 10-15 minutes to restore crispiness. The sauce will get even more caramelized and delicious.