
Main Courses
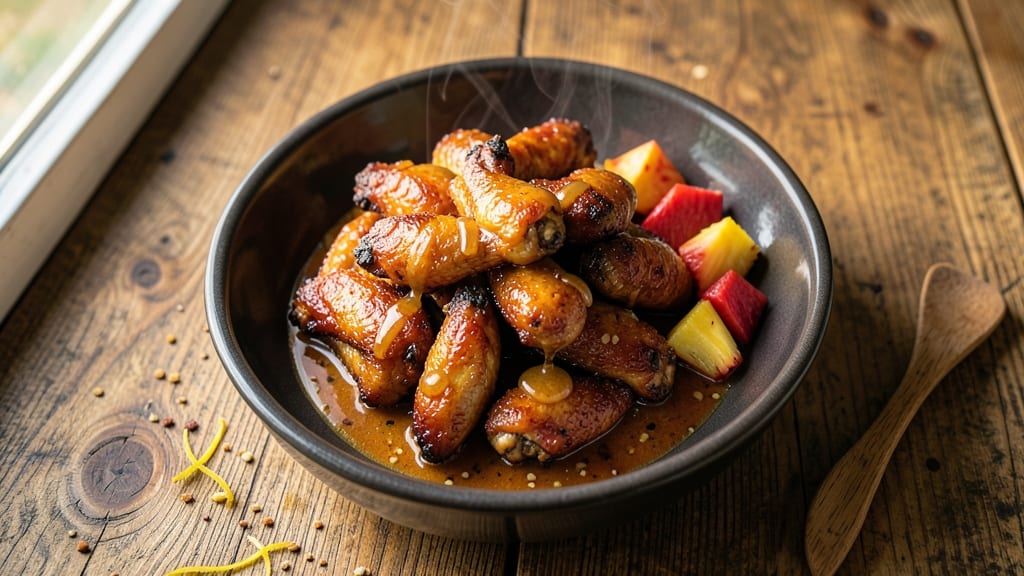
This baked Hawaiian chicken wings recipe delivers perfect caramelized teriyaki-pineapple glaze that transforms ordinary wings into a restaurant-worthy dish. The secret lies in balancing sweet, tangy, and savory flavors—just like your favorite Hawaiian plate—while ensuring crispy edges and tender meat.
I’ve refined this recipe over years of testing, and it’s now a go-to for game day, family dinners, or whenever you crave bold, sticky wings without the fryer mess.
The process starts with a simple marinade of soy sauce, pineapple juice, and garlic, which infuses the wings with deep umami and tropical brightness. After baking, the teriyaki glaze—thickened with honey and cornstarch—develops a glossy, caramelized finish that clings beautifully.
The key is baking at 400°F for 45 minutes, flipping halfway, to guarantee crispy skin and juicy centers every time. No deep-frying required, just foolproof results.
By the end, you’ll have wings that are sticky, sweet, and slightly smoky, with a bright pineapple tang cutting through the richness. The glaze caramelizes into a glossy sheen, making each bite irresistibly crispy while keeping the meat tender.
Serve with extra glaze for dipping or pair with a cool cucumber salad to balance the heat. This recipe proves you don’t need a fryer to make wings that steal the show.
Whether you’re feeding a crowd or treating yourself, these wings deliver restaurant-quality flavor with minimal effort. The glaze can be doubled for leftovers, and the marinade works for other proteins too. Let’s get cooking—your taste buds will thank you.
Ingredients for baked hawaiian chicken wings
Sixteen wings, bold flavors, and a glaze that caramelizes like your favorite Hawaiian plate.
| Ingredient | Amount | Notes |
|---|---|---|
| Chicken Wings 🍗 | 2 lb | Drumettes and flats, skin-on |
| Soy Sauce 🍶 | ½ cup | Low-sodium preferred |
| Pineapple Juice 🍍 | ½ cup | Fresh or canned, no sugar added |
| Garlic Cloves 🧄 | 4 cloves | Minced for marinade |
| Honey 🍯 | ¼ cup | Wildflower or clover preferred |
| Cornstarch 🌾 | 2 tbsp | For glaze thickening |
| Brown Sugar 🍚 | ¼ cup | Packed, light or dark |
| Sesame Oil 🫒 | 1 tbsp | Toasted sesame oil for aroma |
| Fresh Ginger 🌿 | 1 tbsp | Grated, for marinade depth |
| Olive Oil 🫒 | 1 tbsp | For tossing wings |
| Salt 🧂 | 1 tsp | Kosher or sea salt |
| Black Pepper 🌶️ | ½ tsp | Freshly ground |
| Sesame Seeds 🌻 | 1 tbsp | For garnish (optional) |
The wings are non-negotiable—drumettes and flats give you that perfect balance of crispy skin and juicy meat. Costco or Trader Joe's usually have pre-cut packs, but if you're buying whole wings, look for ones with the skin still attached. The skin crisps up beautifully and keeps the meat moist. Fresh garlic and ginger are worth the extra minute to grate or mince (no powder shortcuts here). For the pineapple juice, Dole or Del Monte cans work fine, but if you've got fresh pineapple, strain the juice—it's game-changing. The soy sauce? Kikkoman or San-J are my go-tos, but any good-quality low-sodium brand does the trick.
No sesame oil? Toasted peanut oil at half the amount gives a similar nutty depth. Running short on cornstarch? Arrowroot powder works 1:1, but cornstarch gives that classic teriyaki sheen. The brown sugar can be swapped for white sugar plus a pinch of molasses if that's what you've got. Fresh ginger? Dried powdered ginger at one-quarter the amount works in a pinch, but fresh has that zing. For the glaze, don't rush the caramelization—low and slow at 350°F for 10-15 minutes after brushing on the wings ensures that perfect glossy finish. And if you're feeling fancy, add a splash of rice vinegar to the marinade for extra tang.
Wings keep best in the fridge for 3-4 days if stored in an airtight container with a paper towel to absorb moisture. The glaze reheats beautifully—just pop it in the microwave for 20-30 seconds to loosen it up. For leftovers, I like to portion them into single-serving containers so they're ready for quick lunches. The glaze freezes well too—store it in an ice cube tray for easy dipping portions. Pro tip: Save the leftover glaze in a jar for future wings or drizzle it over rice bowls. It's that good.
Why You'll Love This Recipe
- One-Pan Wonder: I swear by this recipe because it’s that simple—just wings, a bowl, and 20 minutes. No deep fryer, no messy sauces to simmer; the garlic, soy, and pineapple juice caramelize right on the sheet pan while you toss. (Yes, even on a Tuesday night.)
- Sweet-Savory Magic: That balance of sticky honey and tangy pineapple juice? It’s ridiculously good—like a mini Hawaiian vacation in every bite. The garlic gives it depth, but the wings stay crispy, not soggy. My husband always grabs the last one first.
- Game Day Hero: Between us—this is my go-to for Super Bowl parties or lazy Sundays. It’s hearty enough for a crowd but easy enough that I don’t stress. Serve with toothpicks, a cold beer, and you’ve got instant crowd-pleaser status.
- Budget Meal Prep: Honestly, this recipe saves me money and time. Chicken wings are cheaper than takeout, and the leftovers reheat perfectly—crispy edges, juicy inside. I make a double batch, store half, and thank myself later when I’m not scrambling for dinner.
Step-by-step instructions for baked Hawaiian chicken wings
Here's how to achieve that irresistible caramelized glaze and tender wings every time.
Marinate the Wings for Maximum Flavor
In a large bowl, combine the 2 lb chicken wings, 0.5 cup soy sauce, 0.5 cup pineapple juice, 4 cloves minced garlic, 1 tbsp grated fresh ginger, 1 tbsp olive oil, 1 tsp salt, and 0.5 tsp black pepper. Mix gently but thoroughly to coat the wings completely. I like to use my hands for this part—it ensures every wing gets an even coating of marinade.
Cover the bowl with plastic wrap and refrigerate for at least 4 hours (overnight is even better if you can plan ahead). This marinating time is crucial for tenderizing the chicken and infusing it with those tropical flavors. The acidity from the pineapple juice will break down the proteins, making the wings incredibly tender.
Prepare the Pineapple-Teriyaki Glaze
In a medium saucepan, combine 0.25 cup honey, 0.25 cup packed brown sugar, 2 tbsp cornstarch, and 1 tbsp sesame oil. Stir over medium heat until the sugar dissolves completely. This should take about 2-3 minutes—don't rush this step or you'll get grainy glaze.
Once the mixture is smooth, carefully pour in 0.5 cup pineapple juice (from the marinade if possible) and bring to a gentle simmer. Let it cook for 8-10 minutes, stirring occasionally, until it thickens to a syrupy consistency. You'll know it's ready when it coats the back of a spoon and forms soft peaks when lifted. Remove from heat and set aside—this glaze will only get better as it cools.
Bake the Wings to Golden Perfection
Preheat your oven to 400°F and line two baking sheets with parchment paper. Arrange the marinated wings in a single layer on the prepared sheets, leaving about 1 inch between each piece. This spacing is important—it allows the glaze to caramelize properly without steaming.
Bake for 30 minutes, then flip the wings using tongs. This is where the magic happens—they'll start to develop that beautiful golden-brown color. After another 15 minutes, you should see the edges beginning to crisp up. If you're worried about drying out, don't be—the pineapple juice in the marinade keeps them juicy.
Glaze and Caramelize for Maximum Flavor
Remove the wings from the oven and transfer them to a large bowl. Pour the prepared glaze over the wings, tossing gently to coat them evenly. Return them to the baking sheets and bake for another 10-12 minutes at 425°F—this higher temperature helps the glaze caramelize beautifully.
Here's the thing—you want the glaze to be sticky and glossy when you pull them out. If it looks too dry, brush on a little more glaze. The wings are done when they're deep golden brown and the glaze has thickened into a glossy coating. Watch them carefully in the last few minutes to prevent burning.
Garnish and Serve Immediately
Transfer the wings to a serving platter and sprinkle with 1 tbsp sesame seeds for that final touch of texture. Serve immediately while the glaze is still warm and sticky—this is when they're at their absolute best. The contrast of sweet, tangy glaze with the savory chicken is what makes these wings so special.
For extra presentation, drizzle any remaining glaze from the bowl over the top. These wings pair perfectly with steamed rice or a simple cucumber salad to balance the richness. Leftovers? Store in an airtight container and reheat in the oven at 350°F for 10 minutes to revive that caramelized crust.
Pro Tips For Making Baked Hawaiian Chicken Wings
- CRANK THE OVEN TO 425°F: Start these wings hot—no half-measures. I used to bake them at 375°F and ended up with soggy, underwhelming glaze. The high heat caramelizes the honey and pineapple juice faster, giving you that sticky, glossy crust in 20 minutes instead of 30.
- USE FRESH GARLIC, MINCED FINE: Pre-minced garlic from a jar? Skip it. Fresh garlic cloves, peeled and minced with the flat side of your knife, release more flavor. Smash them slightly first—this breaks down the cells and makes the sauce taste like it’s been simmering for hours.
- PAT DRY WINGS BEFORE MARINATING: Wet wings = steam = bland wings. Toss them on paper towels and blot until they’re bone-dry before slathering them in the soy-honey mix. I learned this the hard way when my first batch tasted more like boiled chicken than crispy wings.
- BASTE MIDWAY WITH RESERVED GLaze: Save ¼ cup of your glaze before tossing the wings. After 15 minutes, pull them out, spoon that reserved sauce over them, then return to the oven. The extra moisture keeps the edges crispy without drying out the meat—no more rubbery wings.
Make-ahead tips for this recipe
Marinade Prep Ahead
Make the marinade up to 3 days in advance and store it in an airtight container in the fridge. I like to prep this while I’m making dinner—just toss the wings in when I’m ready to cook.
The flavors deepen over time, so overnight marinating is ideal, but even 4 hours makes a noticeable difference. 🌿
Glaze Pre-Make
Prepare the teriyaki glaze 1 day ahead and store it in a sealed jar in the fridge. It thickens as it cools, so you may need to thin it slightly with 1-2 tsp water before using.
I’ve made batches of this glaze that lasted 2 weeks—perfect for quick weeknight meals or game day appetizers.
Wing Prep Shortcut
Pat the wings dry and season them with salt and pepper, then store them in a ziplock bag in the fridge for up to 24 hours before marinating.
This step saves time and keeps them ready to go when you’re ready to cook. I often do this the night before a big game—no last-minute prep needed!
Freezer-Friendly
Marinated wings freeze beautifully for up to 2 months. Place them on a baking sheet, freeze solid, then transfer to a ziplock bag to save space.
When ready to bake, thaw in the fridge overnight, then proceed with the recipe as written. No texture loss here—just convenient make-ahead magic. ❄️
Glaze Batch Cook
Double or triple the glaze recipe and freeze it in ice cube trays or small jars. Each cube or jar makes a perfect dipping sauce for future wings or rice bowls.
I keep a stash in my freezer for quick meals—I just pop out what I need and reheat it gently. It’s like having a backup glaze factory! 💡
Game Day Hack
Prep everything except the final baking step 24 hours ahead. Store the marinated wings and pre-made glaze separately in the fridge. On game day, just bake and glaze—no stress!
I’ve done this for Super Bowl parties, and it’s a lifesaver when you’re hosting. The crowd won’t know the difference from fresh-prepped wings. 🏈
Nutrition facts
Frequently asked questions
Can I use boneless wings for this recipe?
Boneless wings work perfectly, but you'll need to adjust the baking time to 25-30 minutes total (flip once at 20 minutes) since they cook faster without bones. The glaze will still caramelize beautifully, and you'll save time cleaning up bones. For extra crispiness, pat them very dry before baking.
What if my glaze turns out too runny?
Simmer the glaze uncovered for another 3-5 minutes to thicken it naturally. If it's still too thin, mix 1 tsp cornstarch with 1 tbsp water, stir into the glaze, and cook for 1-2 minutes until it reaches the right consistency. The glaze should coat the back of a spoon but still be pourable.
How can I make these wings spicier?
Add 1 tbsp sriracha or chili garlic sauce to the marinade, or sprinkle 1 tsp cayenne pepper or red pepper flakes over the wings before the final baking. For heat lovers, brush on extra glaze mixed with 1 tsp gochujang (Korean chili paste) after baking. Start with small amounts—you can always add more!
Can I bake these wings in an air fryer?
Yes! Preheat air fryer to 375°F and bake wings for 18-20 minutes, flipping halfway. After baking, toss with glaze and air fry for another 3-5 minutes at 400°F to caramelize. The air fryer gives slightly crispier results, but monitor closely to avoid burning the glaze.
Why are my wings dry after baking?
Overbaking or overcrowding the pan are the most common causes. Bake in a single layer with 1 inch between wings and use a meat thermometer—wings are done at 165°F internal temperature. The pineapple juice in the marinade helps retain moisture, but don't exceed 50 minutes total baking time.