
Main Courses
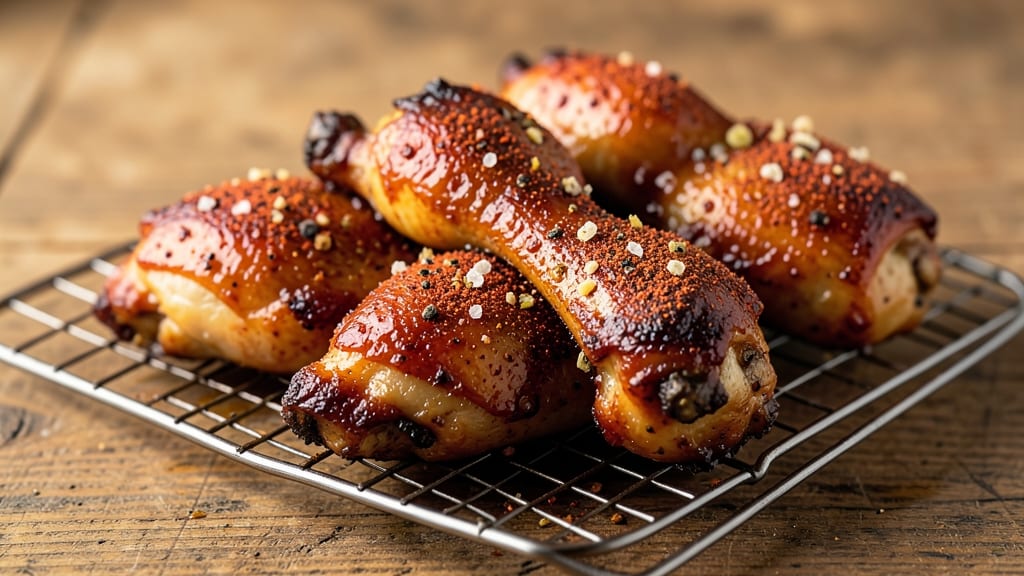
Mastering chicken thighs and legs means achieving that perfect balance of crispy-skinned, juicy-centered meat that transforms any meal. After years of experimentation, I’ve developed a foolproof method that delivers restaurant-quality results at home—whether you’re baking, grilling, or frying.
The secret lies in precise seasoning, controlled heat, and resting time, ensuring every bite is tender without sacrificing that coveted crispiness.
This recipe works for both thighs and drumsticks, giving you maximum flavor and value in every piece.
Whether you’re preparing a weeknight dinner or a showstopping centerpiece for a gathering, the technique remains the same: a dry brine overnight for moisture retention, a simple yet potent spice rub, and a high-heat finish to lock in those flavors. The result?
Meat that’s so tender it practically falls apart while maintaining a skin so crispy it could stand up on its own.
What sets this method apart is its versatility—adapt it to your favorite global flavors, from Moroccan spices to Southern-style fried chicken. The key is patience: letting the chicken rest after cooking ensures juices redistribute, while the crispy skin stays intact.
No more dry, overcooked chicken or soggy, flavorless bites. This is the recipe that finally delivers on those promises.
Pair it with a bright citrus salad, roasted vegetables, or a bold red wine to elevate the meal further. Once you try this method, you’ll never settle for anything less than perfectly executed chicken thighs and legs again. Let’s get started—your taste buds will thank you.
Ingredients for chicken thighs and legs
The secret to restaurant-quality chicken thighs and legs—crispy skin, juicy centers—starts with these 13 ingredients.
| Ingredient | Amount | Notes |
|---|---|---|
| Chicken Thighs and Drumsticks 🍗 | 2 ½ lb | Bone-in, skin-on preferred |
| Diamond Crystal Kosher Salt 🧂 | 1 tbsp | For dry brine overnight |
| Ground Black Pepper 🌶️ | 1 ½ tsp | Freshly cracked preferred |
| Smoked Paprika 🌶️ | 1 tbsp | For deep, smoky flavor |
| Garlic Powder 🧄 | 1 tbsp | Freshly ground if possible |
| Onion Powder 🧅 | 1 tbsp | For subtle sweetness |
| Dried Thyme 🌿 | 1 tsp | Or fresh thyme at 3x amount |
| Extra-Virgin Olive Oil 🫒 | 2 tbsp | For crispy skin finish |
| Cornstarch 🌾 | 2 tbsp | For extra crispiness |
| Fresh Lemon Juice 🍋 | 1 tbsp | Brightens flavors |
| Unsalted Butter 🧈 | 2 tbsp | Melted for basting |
| Fresh Rosemary 🌿 | 1 whole | Sprig for aroma |
| Fresh Parsley 🌿 | ¼ cup | Chopped for garnish |
The chicken is non-negotiable here. Bone-in, skin-on thighs and drumsticks deliver maximum flavor and moisture—skip the boneless breasts. I always grab mine from Whole Foods or the butcher counter at Kroger, where they're freshest. Look for pieces with a vibrant pink color and minimal bruising. If you can't find drumsticks, thighs alone work, but you'll lose that extra juicy center. For a crowd, Costco's family packs are a game-changer—just double the seasoning.
No smoked paprika? Regular paprika plus a pinch of liquid smoke gets you close. Fresh thyme? Use three times the amount of dried. The cornstarch is optional but worth it—it creates that golden, shatterable crust. Short on time? Substitute arrowroot powder at the same ratio. For the olive oil, Trader Joe's brand is my go-to—it's affordable and has great flavor. And that lemon juice? Freshly squeezed makes all the difference—bottled just won't cut it. The butter for basting should be unsalted so you control the seasoning.
This recipe rewards patience. After brining overnight, pat the chicken dry with paper towels—no damp skin means better crispiness. Store the seasoning mix in a small jar for up to 6 months in a cool, dark place. Cooked chicken keeps for 3 days in the fridge, but honestly? It's best eaten fresh. For meal prep, portion into airtight containers with a splash of lemon juice to keep it moist. Freezes beautifully for 3 months—just thaw in the fridge overnight.
Why You'll Love This Recipe
- Here’s what sold me: the smoked paprika gives it this deep, woodsy warmth, while the garlic powder adds a bright, savory punch. The thighs stay juicy inside, but the skin gets this addictive crunch—like a cross between a campfire and your grandma’s kitchen.
- One-Pan Magic: I swear by this recipe when I’m too tired to scrub pots—just toss the thighs and drumsticks on a sheet pan, sprinkle the salt, pepper, and smoked paprika, then let the oven do the work. The garlic powder infuses everything as it roasts, and honestly? That crispy skin is worth the minimal effort.
- Smoky Garlic Crunch: Here’s what sold me: the smoked paprika gives it this deep, woodsy warmth, while the garlic powder adds a bright, savory punch. The thighs stay juicy inside, but the skin gets this addictive crunch—like a cross between a campfire and your grandma’s kitchen.
- Leftovers That Don’t Suck: Between us, most chicken recipes turn into sad, dry leftovers. Not this one. The thighs stay tender for days, and I’ll repurpose them into tacos, salads, or even fried rice without a second thought. (Yes, even on a Tuesday night.)
Step-by-step instructions for crispy-skinned, juicy chicken thighs and legs
Here's the method that guarantees perfectly crispy skin and impossibly tender meat every time.
Prepare the Dry Brine Overnight
Pat the 2.5 lb chicken thighs and drumsticks completely dry with paper towels—this is absolutely critical for crispy skin. Place them skin-side up in a single layer on a wire rack set over a baking sheet. This elevation allows air to circulate on all sides.
In a small bowl, combine 1 tbsp diamond crystal kosher salt, 1.5 tsp ground black pepper, 1 tbsp smoked paprika, 1 tbsp garlic powder, and 1 tbsp onion powder. Sprinkle this mixture evenly over the chicken, pressing it gently into the skin and meat. Add 1 tsp dried thyme and a whole fresh rosemary sprig to the mix, letting the rosemary infuse the meat with aroma.
Cover the baking sheet loosely with plastic wrap and refrigerate overnight. This dry brine process works magic—it seasons the meat deeply, helps retain moisture, and creates that coveted crispy skin. The longer it brines, the better the results, but even 12 hours will make a noticeable difference.
Create the Cornstarch Coating for Extra Crispiness
The day of cooking, remove the chicken from the refrigerator and let it sit at room temperature for 30 minutes. This ensures even cooking. In a shallow dish, combine 2 tbsp cornstarch with 1 tbsp fresh lemon juice and 2 tbsp extra-virgin olive oil. Stir until smooth—this mixture will create an irresistible golden crust.
Working in batches if needed, dip each piece of chicken in the cornstarch mixture, coating it thoroughly on all sides. Let the excess drip off, but don't shake off the coating—this is what will give you that restaurant-quality crispiness. Place the coated chicken on a clean wire rack set over a baking sheet.
Here's the thing—this cornstarch coating isn't just about crispiness. It also helps create a barrier that locks in juices while the chicken cooks, ensuring that juicy center you're after. The lemon juice in the coating adds a subtle brightness that balances the richness of the meat.
Roast to Perfect Doneness
Preheat your oven to 425°F with the rack positioned in the middle position. This high temperature is key for achieving that crispy skin while keeping the meat juicy inside. Place the prepared chicken on the rack and roast for 45 minutes, flipping the pieces once halfway through cooking.
After 45 minutes, reduce the oven temperature to 375°F. This is where the magic happens—lowering the heat allows the chicken to cook through gently while maintaining that crispy exterior. Continue roasting for another 20-25 minutes, or until the internal temperature reaches 165°F when measured in the thickest part of the thigh.
You'll know it's done when the skin is deep golden brown and crispy, and the juices run clear when you pierce the thickest part of the meat. The cornstarch coating should be crackling and golden—this is your visual cue that the chicken is perfectly cooked. If you're unsure, use an instant-read thermometer for accuracy.
Finish with Butter and Garnish
Remove the chicken from the oven and transfer it to a serving platter. Immediately melt 2 tbsp unsalted butter in a small saucepan over low heat. Once melted, brush the butter generously over the chicken, letting it soak into the crispy skin and add an extra layer of richness.
Garnish with 0.25 cup chopped fresh parsley for a pop of color and freshness. The parsley not only looks beautiful but also adds a subtle herbal note that complements the smoky, spiced flavors. Let the chicken rest for 5 minutes before serving—this allows the juices to redistribute throughout the meat, ensuring each bite is as juicy as the first.
Serve immediately while the skin is still crispy and the meat is piping hot. The contrast between the crispy exterior and tender interior is what makes this recipe a true masterpiece. Pair it with roasted vegetables or a fresh salad to complete the meal.
Pro Tips For Making Chicken Thighs And Legs
- CRANK THE HEAT FIRST: Start your chicken thighs and drumsticks over medium-high heat—no simmering. I used to cook them on medium and wondered why they turned out dry. High heat sears the skin faster, locking in juices and building that crispy crust you actually want.
- PAT THE DRY BEFORE SALTING: Wipe the chicken with paper towels until it’s bone-dry—this isn’t optional. I learned this the hard way when my smoked paprika just sat there, not sticking. Dry skin = better crust, and that’s what makes this recipe shine.
- SALT IN TWO STAGES: Salt the chicken generously before cooking, then add another pinch of Diamond Crystal kosher salt halfway through. The first layer seasons the meat, and the second boosts the skin’s crispiness. (Yes, even if you’re impatient like me.)
- DON’T OVERCROWD THE PAN: Cook the thighs and drumsticks in a single layer—no stacking. I crammed mine once and ended up steaming them instead of browning. Give them space, or you’ll regret it when they turn out soggy.
Wine and beer pairings for this dish
Red Wine Pairings
For this rich, spiced chicken, I always reach for a medium-bodied red wine that can stand up to the smoky paprika and crispy skin. A Syrah from Washington State—like Chateau Ste. Michelle—is my go-to because its dark fruit flavors and subtle pepper notes complement the dish beautifully.
The acidity cuts through the richness, while the earthy undertones mirror the smoked paprika in the seasoning. 🍷
If you prefer something lighter, a Spanish Garnacha (Grenache) from Priorat offers bright red berry flavors and a touch of spice that harmonizes perfectly. Avoid heavy, tannic wines like Cabernet Sauvignon—they can overpower the delicate balance of crispy skin and tender meat.
White Wine Options
Don’t dismiss white wine! A dry Viognier from California—such as Ramey Wine Cellars—works surprisingly well with the lemony brightness in the cornstarch coating. Its floral and stone fruit notes contrast the smoky spices, creating a refreshing balance.
Serve it slightly chilled (45-50°F) to enhance its crisp acidity. 🍷
Beer Pairings
For a beer lover’s twist, I recommend a Belgian-style witbier like Hoegaarden. The citrusy coriander and orange peel notes in the beer mirror the lemon juice in the coating, while the effervescence cleanses the palate between bites.
Another great choice is a German Helles Lager—its malty sweetness and subtle hop bitterness complement the crispy skin without competing.
Avoid heavy stouts or IPAs—they’ll overpower the delicate flavors of the chicken. Instead, opt for a crisp pale ale like Allagash White if you want a lighter option with just enough hop character to enhance the meal.
Non-Alcoholic Options
For a refreshing non-alcoholic choice, I love serving sparkling rosé lemonade. Mix 1 cup sparkling water with ½ cup rosé grape juice and 1 tbsp fresh lemon juice, then chill over ice. The effervescence and citrus notes cut through the richness, making it a perfect palate cleanser. 💧
Another great option is hibiscus iced tea—its tart, cranberry-like flavor balances the smoky spices beautifully. Brew 2 tbsp dried hibiscus flowers in 4 cups hot water, steep for 10 minutes, then chill and serve over ice with lemon slices.
Nutrition facts
Frequently asked questions
Why do you recommend bone-in, skin-on thighs and drumsticks?
The skin creates that perfect crispy texture, while the bones add incredible flavor and moisture to the meat. Bone-in pieces stay juicier longer because the bone acts as a natural insulator. Drumsticks also have a higher fat content, which makes them more forgiving for high-heat cooking and adds richness. Skip boneless breasts—they dry out quickly and lack that satisfying texture contrast.
Can I use this recipe for just thighs or just drumsticks?
The technique works for both, but thighs cook slightly faster than drumsticks. If using only thighs, reduce the total cooking time by about 5-10 minutes (watch for 165°F internal temp). For drumsticks alone, add 5-10 minutes to the second roasting phase. The cornstarch coating and dry brine method ensure crispy skin regardless of which pieces you choose.
What if I don't have cornstarch? Can I substitute?
Yes! Use arrowroot powder or potato starch in a 1:1 ratio—they create similar crispiness. For a gluten-free option, try tapioca starch. If you're out of all starches, a light dusting of semolina flour works in a pinch, though the texture will be slightly less crisp. The key is coating the chicken thoroughly before roasting.
How do I fix chicken that's dry or overcooked?
If the chicken turns out dry, it likely didn't rest long enough or was cooked at too high a temperature. To salvage it, shred the meat and mix with 2 tbsp unsalted butter, 1 tbsp lemon juice, and 1 tsp smoked paprika—this adds moisture and flavor. For slightly overcooked pieces, try slicing thinly and serving in tacos or sandwiches where the texture won't be as noticeable. Prevention is key: always use a meat thermometer and rest the chicken for 5 minutes before serving.
Can I make this recipe ahead of time?
You can prep the chicken up to 24 hours ahead by completing the dry brine and cornstarch coating, then refrigerating uncovered on a wire rack. Cook it straight from the fridge (add 10-15 minutes to the roasting time). For leftovers, store in an airtight container for up to 3 days. Reheat gently in a 350°F oven for 10-15 minutes to restore crispiness—broiling for the last 2 minutes helps revive the skin.