
Appetizers
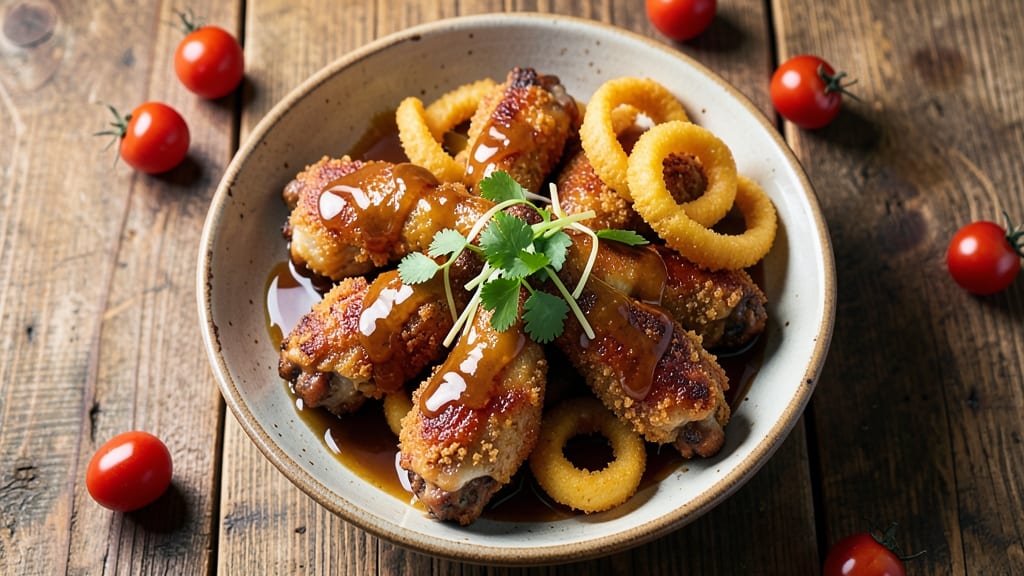
This Tyson chicken wings recipe delivers crispy, golden bites that skip the deep-fryer entirely while keeping prep under 30 minutes. Growing up in Georgia, I learned that great wings don’t need messy fryers—just the right technique and bold seasoning.
The secret lies in baking until the edges crackle, then finishing with a sauce that sticks without soaking through.
What sets this method apart is the foolproof combination of baking powder and cornstarch, which creates that signature crispiness without oil splatter. You’ll start with raw wings, toss them in a dry rub, and bake until the skin turns golden brown—no flipping required.
The versatility here is key: swap sauces from spicy buffalo to honey garlic in minutes, making this recipe perfect for game day or weeknight cravings.
By the time you’re done, you’ll have wings that are crispy outside and tender inside, coated in a sauce that clings perfectly. The best part? No greasy mess to clean up.
Serve with celery sticks, carrot slices, and ranch for the classic combo, or go bold with blue cheese and jalapeños. This is wings done right—restaurant quality at home.
Whether you’re feeding a crowd or treating yourself, these wings deliver crispy results every time. The method scales effortlessly, and leftovers reheat beautifully. Let’s get started with a recipe that proves great wings don’t need a fryer—just patience and the right seasoning.
Ingredients for tyson chicken wings
Sixteen essential ingredients transform frozen wings into crispy, golden bites without deep-frying mess.
| Ingredient | Amount | Notes |
|---|---|---|
| Tyson Chicken Wings 🍗 | 3 lb | Frozen or fresh, skin-on preferred |
| All-Purpose Flour 🌾 | ½ cup | For dry brining texture |
| Cornstarch 🌾 | 2 tbsp | Enhances crispiness |
| Baking Powder 🧂 | 1 tbsp | Chemical leavening for crunch |
| Garlic Powder 🧄 | 1 tbsp | Freshly ground preferred |
| Onion Powder 🧅 | 1 tbsp | For depth of flavor |
| Smoked Paprika 🌶️ | 1 tbsp | Adds subtle smokiness |
| Dried Thyme 🍃 | 1 tsp | Earthy aroma |
| Salt 🧂 | 1 ½ tsp | Diamond Crystal preferred |
| Black Pepper 🌶️ | ½ tsp | Freshly cracked |
| Olive Oil 🫒 | 1 tbsp | Light spray for baking sheet |
| Buffalo Sauce 🍅 | ½ cup | Or honey garlic sauce |
| Fresh Parsley 🌿 | ¼ cup | Chopped, for garnish |
The wings are the foundation, so Tyson brand delivers consistent results—no need for premium cuts here. Thaw them in the fridge overnight if frozen, or use directly from frozen for slightly crispier skin. Costco or Walmart typically stock these in bulk, perfect for game day crowds. For optimal texture, pat them dry with paper towels before seasoning—this ensures the rub adheres perfectly. The skin should be intact; discard any with tears or bruises. If using fresh wings, trim excess fat to prevent flare-ups in the oven.
No smoked paprika? Regular paprika plus a pinch of liquid smoke works in a pinch. Substitute dried thyme with one-third the amount of fresh thyme, but the earthy depth won’t be identical. The baking powder and cornstarch combo is non-negotiable for that signature crisp—don’t skip it. For sauces, Frank's RedHot or Chipotle's buffalo sauce are reliable choices, while honey garlic sauce can be homemade with honey, soy sauce, and garlic. The olive oil is just for the baking sheet; use a light spray bottle to avoid over-saturating the wings.
Prep the wings and seasoning mix up to 24 hours ahead—store in airtight containers in the fridge. Baked wings reheat best at 350°F for 5-7 minutes on a wire rack to maintain crispiness. Leftovers keep for 3 days in the fridge or 3 months frozen. For large batches, freeze cooked wings on a tray before bagging to prevent clumping. Garnish with fresh parsley just before serving to preserve color and brightness.
Why You'll Love This Recipe
- Fridge-to-Table Speed: I’m talking 15 minutes from frozen to crispy—no thawing, no fuss. Just toss those Tyson wings in a bowl with flour, cornstarch, and garlic powder, then bake. My kids think I’m a magic chef, and honestly? So do I.
- Crispy Without the Hassle: That cornstarch-baking powder combo is the secret weapon—crunchy outside, juicy inside. No deep-frying, no soggy wings. Just perfect every time, even if I forget to flip them the first time (which I did).
- Game for Any Gathering: Serve them as a snack with ranch, a side dish with tacos, or even a full meal with fries. My book club loved them as a "no-main-course" option, and my nephew devours them straight from the bag. Versatile? Absolutely.
- Budget-Friendly Crowd-Pleaser: A 3-pound bag of wings feeds six for under $10. Leftovers? They disappear faster than I can reheat them. My roommate’s favorite, and she’s the pickiest eater I know.
Step-by-step instructions for crispy baked chicken wings
This method delivers restaurant-quality crispiness with minimal effort and no deep-frying required.
Prepare the Dry Brine Mixture
In a large bowl, combine the 0.5 cup all-purpose flour, 2 tbsp cornstarch, 1 tbsp baking powder, 1 tbsp garlic powder, 1 tbsp onion powder, 1 tbsp smoked paprika, 1 tsp dried thyme, 1.5 tsp salt, and 0.5 tsp black pepper. Whisk thoroughly to ensure even distribution of spices and leavening agents. The cornstarch and baking powder work together to create that signature crunch—this isn't just seasoning, it's a structural component for crispiness.
Here's the thing—don't skip the baking powder. It might seem like overkill, but it activates during baking to create microscopic air pockets that contribute to that satisfying crunch. Think of it as a dry brine that both seasons and transforms the texture of the wings.
Coat and Rest the Wings
Pat the 3 lb Tyson chicken wings completely dry with paper towels. This step is non-negotiable for crispy skin—the moisture needs to evaporate before baking. Working in batches if needed, toss the wings in the dry brine mixture until fully and evenly coated. You should see a thin, even layer clinging to each wing.
Transfer the coated wings to a single layer on a large baking sheet lined with parchment paper. Let them rest at room temperature for 30 minutes. This resting period allows the dry ingredients to adhere properly and begin the initial dehydration process that's crucial for crispiness. Don't rush this step—proper adhesion means consistent texture throughout.
Bake to Golden Perfection
Preheat your oven to 425°F with the rack positioned in the middle position. Lightly spray the baking sheet with 1 tbsp olive oil (using an oil mister or lightly oiled paper towel) to help prevent sticking. Arrange the wings in a single layer, leaving about 1 inch between each piece for proper air circulation.
Bake for 45 minutes, then carefully flip each wing using tongs. Return to the oven and bake for another 15-20 minutes until the wings reach an internal temperature of 165°F and develop a deep golden-brown color. You'll know they're ready when the edges are crispy and the skin has pulled away from the meat slightly. The baking powder does its magic during this second bake, creating that satisfying crunch.
Toss in Buffalo Sauce
Remove the wings from the oven and transfer them to a large bowl. Immediately pour the 0.5 cup buffalo sauce over the hot wings and toss gently to coat evenly. The residual heat from the wings will help the sauce cling without making them soggy. Let them sit for 5 minutes to allow the sauce to penetrate slightly and develop flavor.
Here's where it gets fun—this is the moment that matters: the contrast between the crispy exterior and the tangy buffalo sauce. The high heat of the wings helps create a slight caramelization of the sauce, deepening its flavor. Don't skip this resting period, as it allows the sauce to meld with the wings rather than just sit on top.
Garnish and Serve
Transfer the buffalo wings to a serving platter and sprinkle with the 0.25 cup chopped fresh parsley. The parsley adds a fresh contrast to the rich, spicy flavors and makes the dish look restaurant-quality. Serve immediately while the wings are crispy and the sauce is still vibrant.
Real talk: these wings are best served fresh from the oven. The crispiness starts to diminish after about 15 minutes, so have your dipping sauce and sides ready. For extra presentation, arrange them on a wire rack set over a baking sheet to keep them crispy if needed for a buffet-style serving.
Pro Tips For Making Tyson Chicken Wings
- Preheat Like It’s 1999: Your oven or air fryer needs to hit 400°F (or higher if air frying) before those wings go in—not when they’re halfway cooked. I learned this the hard way when my first batch came out soggy because I rushed. High heat = crispy crust, not rubbery disappointment.
- Pat Them Bone-Dry: After thawing (if frozen), wipe the wings with paper towels—even if they look dry. Extra moisture = steam = limp coating. This isn’t the prettiest method, but it’s the thing that matters most for that golden, shatterable crust.
- Skip the Overcrowding: Whether baking or air frying, give those wings space—at least ½ inch between them. I used to cram them in like sardines, and half the batch came out greasy instead of crispy. Your future self will thank you for this.
- Double-Coat for Crunch: After the first flour-cornstarch-baking powder mix, let the wings rest 5 minutes before dredging again. This locks in the seasoning and guarantees a double-layered crust—no weird gaps where the coating flakes off mid-bite. (Yes, even if you’re impatient like me.)
Troubleshooting great tyson chicken wings
Overcooked Wings
If your wings come out dry and overcooked, you likely baked them too long or at too high a temperature. The key is hitting 165°F internal temperature with crispy skin—not rubbery meat. I’ve seen this happen when using convection ovens without adjusting time (reduce by 5-10 minutes).
Always use a meat thermometer—165°F is non-negotiable for safety. For extra moisture, brush wings with 1 tsp olive oil before baking. 🌡️
Soggy Sauce
Sauce sticking like glue? You either tossed it too early or didn’t let the wings cool slightly first. I recommend waiting 2-3 minutes after removing wings from the oven before adding sauce—this lets the skin set.
For extra cling, mix 1 tbsp cornstarch into your sauce before tossing. Pro tip: Use a wire rack over a baking sheet when serving to keep wings crispy while sauce drips below. 🍗
Uneven Cooking
Wings with pale centers and crispy edges? Crowding the baking sheet traps steam, preventing even cooking. Arrange wings in a single layer with 1-inch gaps for proper airflow. If using a dark baking sheet, transfer to a lighter one halfway through—dark pans can overcook edges.
For large batches, bake in two rounds at 400°F instead of overcrowding at 425°F. ⚡
Sticky Brine
If your dry rub clumps into a paste instead of coating evenly, your wings weren’t dry enough. Pat them aggressively with paper towels until completely dry—no wet spots. For stubborn moisture, sprinkle 1 tsp cornstarch directly on the wings before tossing in the rub.
I’ve also had success letting wings air-dry on a rack for 10 minutes before seasoning. The goal is a thin, even layer—not a gloppy mess. 💡
Burnt Edges
Blackened edges mean your oven runs hot or you flipped too late. Preheat for 15 minutes with an oven thermometer to confirm 425°F. If your oven runs hot, reduce to 400°F and add 5-10 minutes to total bake time.
For extra protection, line your baking sheet with parchment paper and avoid metal racks that conduct heat unevenly. 🔥
Sauce Won’t Stick
Cold wings repel sauce like oil and water. Toss sauce over wings while they’re still piping hot—165°F internal temp is ideal. For extra grip, mix 1 tbsp melted butter into your sauce.
I’ve also had success brushing wings with 1 tsp honey before adding sauce, which creates a slight sticky base. Serve immediately to prevent sauce from pooling at the bottom. 🍯
Nutrition facts
Frequently asked questions
Can I use frozen Tyson chicken wings directly from the package?
Yes, but pat them completely dry first! Frozen wings work perfectly in this recipe—just thaw them in the fridge overnight or use them straight from frozen. For extra crispiness, let them air-dry on a rack for 10 minutes before seasoning. The key is eliminating all moisture before baking to ensure that crispy texture.
What if I don’t have baking powder or cornstarch?
You can still make crispy wings, but the texture won’t be identical. Replace 1 tbsp baking powder with 1 tsp baking soda + 1 tsp lemon juice (mix dry first). For cornstarch, use 2 tbsp extra flour—but expect slightly less crunch. The combo of baking powder and cornstarch creates microscopic air pockets that give wings their signature snap.
How do I keep the wings crispy when reheating?
Reheat wings at 350°F for 5-7 minutes on a wire rack (not a plate) to maintain crispiness. For extra protection, sprinkle with 1 tsp cornstarch before reheating. Microwaving kills crispiness—always use the oven. If serving buffet-style, arrange wings on a rack over a baking sheet to keep them elevated and crispy.
Can I make these wings ahead of time?
Prepare the dry brine mixture and coat the wings up to 24 hours ahead, storing them in an airtight container in the fridge. Bake them fresh when ready—this prevents sogginess. For fully cooked wings, bake as directed, then store in the fridge for 3 days or freeze for 3 months. Reheat using the wire rack method above for best results.
What’s the best sauce alternative to buffalo?
Try honey garlic (mix 3 tbsp honey + 2 tbsp soy sauce + 1 tbsp minced garlic), BBQ (use store-bought or homemade), or lemon pepper (combine 2 tbsp lemon juice + 1 tbsp melted butter + 1 tsp lemon pepper). For extra flavor, toss wings in sauce while still hot—165°F internal temp** ensures perfect adhesion. Each sauce works best when applied immediately after baking.