
Main Courses
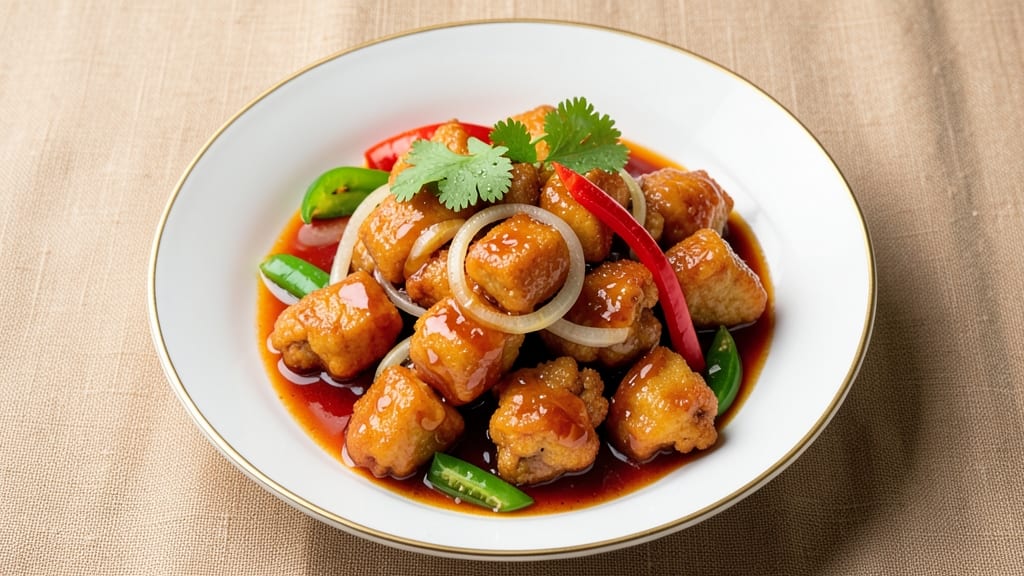
This Pf Chang's sweet and sour chicken copycat recipe delivers the same crispy, golden bites and tangy-sweet glaze you crave from the restaurant—without the wait. I've spent years perfecting copycat recipes, and this one captures the balance of textures and flavors exactly.
The secret lies in a precise marinade and frying technique that ensures every piece stays crispy, while the sauce achieves that signature sweet-tart harmony.
The recipe begins with tender chicken pieces marinated in a blend of cornstarch and spices, then fried to a golden finish. Meanwhile, the sauce simmers down to a glossy, sticky consistency that clings perfectly to each bite.
What sets this apart is the careful reduction of the sauce—too much liquid, and the dish loses its restaurant-quality depth. The result is a dish that looks and tastes just like the original, with that satisfying crunch and bright, balanced flavor.
By the time you plate it, you'll have crispy, caramelized chicken swimming in a glossy sauce that's both tangy and sweet. The sauce's depth comes from a mix of vinegar, sugar, and a touch of ginger, creating layers of flavor that complement the chicken's texture.
Serve it over steamed rice or with steamed broccoli for the full experience. This recipe is designed to impress, whether you're feeding a family or hosting dinner guests.
One of the best parts? The technique scales easily for larger groups, and the sauce can be made ahead to save time. The key is keeping the chicken hot when serving—this ensures that crispy texture stays intact. Let's recreate that restaurant-quality dish in your own kitchen.
Ingredients for pf chang's sweet and sour chicken copycat
Crispy chicken, tangy sauce, and restaurant-quality flavor—just 15 ingredients stand between you and perfection.
| Ingredient | Amount | Notes |
|---|---|---|
| Boneless Chicken Thighs 🍗 | 1 ½ lb | Cut into 1-inch pieces |
| All-Purpose Flour 🌾 | ½ cup | For dredging chicken |
| Cornstarch 🌾 | ¼ cup | For crispy coating |
| Salt 🧂 | 1 tsp | Kosher or sea salt |
| Ground Black Pepper 🌶️ | ½ tsp | Freshly ground preferred |
| Garlic Powder 🧄 | 1 tsp | For marinade depth |
| Vegetable Oil 🫒 | 3 cups | For deep frying |
| White Vinegar 💧 | ½ cup | For tangy sauce |
| Granulated Sugar 🍚 | ½ cup | For sweet glaze |
| Tomato Paste 🍅 | 2 tbsp | Squeeze tube preferred |
| Soy Sauce 🥢 | ¼ cup | For umami depth |
| Ginger Root 🌿 | 1 tbsp | Freshly grated |
| Garlic Cloves 🧄 | 3 cloves | Minced for sauce |
| Green Onion 🧅 | 2 whole | Sliced for garnish |
| Red Bell Pepper 🌶️ | ½ cup | Diced for garnish |
The chicken thighs are non-negotiable—boneless cuts like thighs stay juicy while the skinless version ensures even cooking. Trader Joe's or Costco often have pre-cut pieces, but if you're buying whole, look for plump, pale thighs with minimal fat. The cornstarch is key for that signature crisp—don't skip it. For the sauce, Kroger's squeeze tubes of tomato paste save time, but if you're feeling fancy, San Marzano cans are worth the splurge. The ginger needs to be fresh (the powdered stuff won't cut it here).
No boneless thighs? Breasts work in a pinch, but they'll dry out faster—keep frying time tight. Short on cornstarch? All-purpose flour at 1:1 ratio gets you close, but the texture won't be quite as crisp. Soy sauce swap? Coconut aminos for a gluten-free version. The vinegar can be apple cider if that's what you've got—just add a pinch more sugar to balance. For the bell pepper, any color works, but red gives that classic restaurant look. And if you're feeling lazy, pre-diced frozen veggies save time (just thaw first).
This sauce reheats beautifully—just warm it gently on the stove. The chicken stays crispy for about 20 minutes after frying, so keep it warm in a 200°F oven while you finish the sauce. Garnishes like green onions and bell peppers keep for 5 days in the fridge, while the sauce itself lasts 1 week. Double the sauce recipe? It freezes perfectly for 3 months. Just thaw overnight in the fridge before reheating.
Why You'll Love This Recipe
- Fewer Ingredients, Same Magic: I swear by this version—just chicken thighs, flour, cornstarch, and a pinch of salt. No hidden spices or confusing ratios. The secret? That crispy flour-cornstarch mix (I double-check the ratio every time) gives it that restaurant crunch without extra clutter.
- Tangy Crunch in Every Bite: Honestly, the sauce is what sells me. The moment the sweet-and-sour glaze hits that golden-brown crust? It’s like a flavor explosion. My kids fight over the last piece—even my picky eater—and that’s saying something.
- Leftover Hero: Between us, this is my go-to for lunches. The sauce clings to the chicken, so it reheats like a dream (microwave or pan, no difference). I’ll pack it three days in a row, and it’s still just as good—no sad, dry leftovers here.
- Budget-Friendly Feast: Chicken thighs are cheaper than breasts, and this recipe stretches easily. Double the batch, freeze half, and you’ve got a $10 dinner that feeds four. Plus, the sauce ingredients (vinegar, sugar, ketchup) are pantry staples—no specialty shopping needed.
Step-by-step instructions for Pf Chang's sweet and sour chicken copycat
Here's how to nail that iconic crispy texture and tangy-sweet glaze at home.
Prep and Coat the Chicken for Maximum Crisp
Cut the 1.5 lb boneless chicken thighs into 1-inch pieces—smaller pieces ensure even cooking. In a large bowl, whisk together the 0.5 cup all-purpose flour, 0.25 cup cornstarch, 1 tsp salt, 0.5 tsp ground black pepper, and 1 tsp garlic powder. This blend creates the perfect crispy barrier while keeping the chicken juicy inside.
Dredge each chicken piece in the flour mixture, pressing gently to adhere the coating evenly. Let them sit in the bowl for 5 minutes—this helps the coating stick better during frying. Don't skip this step; it's what gives that signature restaurant crunch. Real talk: If you rush, the coating will flake off in the oil.
Fry Until Golden and Crispy
Pour 3 cups vegetable oil into a deep skillet or Dutch oven and heat over medium-high heat until it reaches 350°F—use a thermometer for accuracy. The oil should shimmer but not smoke. Fry the chicken in batches (don't overcrowd) for 4-5 minutes until golden brown and cooked through. You'll know it's ready when the coating turns crispy and the chicken reaches 165°F internally.
Transfer fried chicken to a paper towel-lined plate to drain excess oil. Here's the thing—if you see any pieces browning too quickly, reduce the heat slightly. The goal is even cooking, not burnt edges. Keep the oil hot for the next batch, but don't let it drop below 340°F or the chicken will absorb too much oil and lose crispness.
Make the Tangy-Sweet Sauce
In the same skillet (with leftover oil), reduce heat to medium and add 2 tbsp tomato paste, stirring for 1 minute until it darkens slightly. Add 0.5 cup granulated sugar, 0.5 cup white vinegar, 0.25 cup soy sauce, 1 tbsp freshly grated ginger root, and 3 minced garlic cloves. Stir constantly for 3-4 minutes until the sugar dissolves and the mixture thickens into a glossy sauce.
This is where the magic happens: The vinegar adds tang, sugar balances it, and soy sauce brings umami depth. If the sauce looks too thick, add 1-2 tablespoons water to loosen it. Your goal is a smooth, coatable consistency—like syrup but with body. Taste as you go; you might want to adjust the sweet-sour ratio to your preference.
Toss Chicken in Sauce and Garnish
Return the fried chicken to the skillet and toss gently to coat evenly in the sauce. Simmer for 2-3 minutes until the chicken absorbs the flavors and the sauce clings to each piece. Here's the moment that matters: The contrast of crispy chicken and glossy sauce is what makes this dish addictive.
Transfer to a serving platter and garnish with 2 sliced green onion and 0.5 cup diced red bell pepper. The bright colors make it look as good as it tastes. Serve immediately over steamed rice—each bite should deliver that perfect balance of sweet, tangy, and umami with a satisfying crunch.
Pro Tips For Making Pf Chang'S Sweet And Sour Chicken Copycat
- CUT THIGHS INTO EVEN STRIPS: I learned this the hard way—uneven strips cook at different rates, and you’ll end up with some rubbery, others mushy. Aim for 1-inch-wide strips, all the same thickness. If your knife skills are rusty, freeze the thighs for 15 minutes first; they’ll hold their shape better when slicing.
- USE CORNSTARCH IN THE BATTER: The copycat recipe often skips this, but adding 1-2 tablespoons of cornstarch to your flour mix makes a real difference. It keeps the coating crispier longer and prevents the batter from turning gummy when frying. (Yes, even if you’re impatient like me—don’t skip this.)
- FRY IN BATCHES, DON’T CROWD: I was skeptical until I tried it: frying a single layer of chicken in hot oil (350°F) guarantees a golden crust. If you pile them in, the oil temp drops, and you’re left with soggy, unevenly cooked pieces. A wire rack helps drain excess oil between batches for extra crunch.
- REST CHICKEN BEFORE FRYING: Pat those thighs dry, then let them sit on a wire rack for 10 minutes—this isn’t the prettiest method, but it’s the tastiest. Cold chicken absorbs marinades better, and the moisture evaporates, so your coating sticks like glue. (Your future self will thank you.)
Storing and reheating this pf chang's sweet and sour chicken copycat
Fridge Storage Tips
Store leftover chicken in an airtight container with a splash of sauce to keep it moist—this prevents the coating from drying out. I like using glass Pyrex containers because they preserve texture better than plastic.
Keep it refrigerated for up to 3 days, but honestly, it's best eaten within 2 days for maximum crispiness. The sauce can be stored separately in a sealed jar for up to 5 days—just reheat it gently on the stove. 💡
Freezer-Friendly Sauce
Double the sauce recipe and freeze half for later—it's perfect for quick meals. Use quart-sized freezer bags or small glass jars, leaving ½-inch headspace for expansion. Thaw overnight in the fridge before reheating.
The sauce keeps for 3 months without losing its vibrant flavor, though the texture might thicken slightly. Just add a splash of water when reheating to restore consistency. ❄️
Reheating Crispy Chicken
To revive that crispy texture, reheat chicken in a skillet over medium heat for 2-3 minutes—no oil needed. The residual coating will crisp up again. Avoid microwaving; it turns the chicken soggy.
For extra crunch, broil for 1-2 minutes at the end. I also keep a 200°F oven handy for holding fried chicken while I finish the sauce—it stays warm without losing crispness. 🔥
Sauce Refresh Tricks
If the sauce tastes flat after reheating, balance it with ½ tsp vinegar or ¼ tsp sugar to restore the sweet-tart profile. For extra depth, stir in 1 tsp soy sauce or a pinch of ginger.
The sauce reheats best on low heat—high heat can make it grainy. Pro tip: Warm it in the same skillet where you fried the chicken; the leftover oil adds richness. 💫
Garnish Make-Ahead
Slice green onions and dice bell peppers 1 day ahead and store them in the fridge. They keep for 5 days in a sealed container. This saves time on serving day—just toss them on top right before plating.
For extra freshness, rinse them under cold water before using. The bright colors make the dish look restaurant-worthy, and they add a crisp contrast to the rich chicken. 🌟
Portion Control
Divide leftovers into single-serving portions before freezing. This way, you only thaw what you need. I use small glass containers for individual servings—they reheat faster and keep the chicken crispier.
Label containers with the date to track freshness. Most importantly, eat within 3 months for best quality, though the flavor holds up well beyond that. 📅
Nutrition facts
Frequently asked questions
Can I use chicken breasts instead of thighs for this recipe?
Chicken breasts work, but they'll dry out faster during frying. If you must use them, cut them into ½-inch pieces and fry for just 3-4 minutes at 350°F—no longer! For extra moisture, marinate the breasts in 1 tbsp soy sauce for 15 minutes before coating. The crispy texture will still be great, but the meat will be slightly less tender.
How do I make the sauce less sweet or more tangy?
For less sweetness, reduce the sugar to 0.375 cup and add 1 extra tbsp vinegar. For more tang, increase the vinegar to 0.6 cup and cut sugar to 0.4 cup. Taste as you go—balance is key! The sauce should be glossy but not syrupy. Adjust while simmering, not after.
What's the best way to keep the chicken crispy when serving?
Keep fried chicken warm in a 200°F oven for up to 20 minutes while finishing the sauce. For extra crunch, reheat in a dry skillet over medium heat for 2 minutes before tossing in sauce. Avoid microwaving—it kills crispiness. The secret? High heat and minimal moisture.
Can I bake the chicken instead of frying?
You can try an air fryer or oven bake, but the texture won't be identical. For air frying, coat chicken as directed and cook at 400°F for 8-10 minutes, shaking halfway. For oven baking, use 425°F for 12-15 minutes on a wire rack. The result will be tender but not as crispy—frying is the gold standard for this dish.
Why did my sauce turn grainy when reheating?
Graininess happens when the sauce cools too much or thickens unevenly. To fix it, whisk in 1-2 tbsp warm water or broth while reheating on low heat. For prevention, store sauce in a sealed jar and reheat gently. If it's too thick, thin with ½ tsp vinegar—never boil it. The sauce should be smooth like syrup.